Authentication
All API requests must be authenticated. You can get your initial credentials or refresh them if your security has been compromised.
Generate Authentication Token
Here is the utility to generate your authentication token. Please provide your login credentials below. The Credentials will be displayed in the right side box and you can use them while integrating it with your software.
Credentials will appear here.
Regenerate Token
To proceed with regenerating your User Authentication details click on the regenerate button.
New credentials will appear here.
How to use Credentials
Include the following parameters in your HTTPS Request Headers:
user-id: "YOUR_USER_ID"auth-token: "YOUR_AUTH_TOKEN"
Active Credentials
---
---
FAQ & Developer Support
Common technical questions for integrating Nadi Tarangini hardware and APIs.
user-id and auth-token are included in the Header of your request. These credentials are required for every API call to retrieve patient or report data.
visit_id or report using these Data Management APIs.
Mobile App Integration
To begin your integration, download the NT Capture APK for Android. This APK is required to bridge the communication between your software and the Nadi Tarangini device. Use the download button below to fetch the latest stable build.
Note : Currently, the NT Capture application is available for Android. The iOS version is currently in development and will be released soon.
Need a completion callback?
If your mobile application needs a server-to-server confirmation after capture completes successfully, configure a webhook URL and use the payload documented in the Webhook Notifications section.
View Webhook NotificationsFlutter Implementation
final String path = "nadi://home?user_id={{USER_ID}}&auth_token={{AUTH_TOKEN}}"
                    "&visit_id={{VISIT_ID}}&client_code={{CLIENT_CODE}}"
                    "&height={{HEIGHT}}&weight={{WEIGHT}}&age={{AGE}}&gender={{GENDER}}"
                    "&prakruti={{PRAKRUTI}}&major_symptoms={{SYMPTOMS}}";

if (await canLaunchUrl(Uri.parse(path))) {
    await launchUrl(Uri.parse(path), mode: LaunchMode.externalApplication);
}
Where to add this code?
Developers should implement these snippets on the specific screen within their application where the user is ready to begin the diagnostic process. This is typically triggered by a "Start Assessment" or "Capture Pulse" button.
Why do we use this code?
This implementation utilizes a "Deep Link" system via the standard scheme nadi://home. It allows your "Sender" application to securely pass patient metrics (Height, Weight, Age) and authentication keys (User ID, Auth Token) directly to our diagnostic app. This creates a seamless transition for the user, as the NT Capture app will open pre-filled with the necessary data, ready to connect to the hardware immediately.
Android Implementation (Android-Based Application)
val url = "nadi://home?user_id={USER_ID}&auth_token={AUTH_TOKEN}&visit_id={VISIT_ID}&client_code={CLIENT_CODE}&height={HEIGHT}&weight={WEIGHT}&age={AGE}&gender={GENDER}&prakruti={PRAKRUTI}&major_symptoms={SYMPTOMS}"
val intent = Intent(Intent.ACTION_VIEW, Uri.parse(url))
startActivity(intent)
Where to add this code?
Developers should implement these snippets for the Android Platform on the screen where the Nadi assessment is initiated.
Why do we use this code?
Native Android applications use Intents to communicate with other apps. By using the nadi://home scheme, your app instructs the Android OS to open the NT Capture app and transfer patient details instantly without manual data entry.
IOS Implementation (IOS-Based Application)
let urlString = "nadi://home?user_id={USER_ID}&auth_token={AUTH_TOKEN}&visit_id={VISIT_ID}&client_code={CLIENT_CODE}&height={HEIGHT}&weight={WEIGHT}&age={AGE}&gender={GENDER}&prakruti={PRAKRUTI}&major_symptoms={SYMPTOMS}"
if let url = URL(string: urlString) {
    UIApplication.shared.open(url)
}
Where to add this code?
Developers should implement these snippets for the iOS Platform on the screen where the Nadi assessment is initiated.
Why do we use this code?
Using UIApplication.shared.open with our custom URL scheme ensures that the diagnostic data is passed securely between apps on iOS. This streamlines the workflow by ensuring the app is ready for pulse capture the moment it is opened.
Parameter Reference
Comprehensive list of parameters used in the SDK authentication and data payload.
| Parameter | Required | Description | Request Value |
|---|---|---|---|
| Authentication & Identity | |||
user_id |
Yes | Practitioner's unique identification number | 12345 |
auth_token |
Yes | Secure API token for session authorization | 25be054659f8eb164a61a02567449899 |
client_code |
Yes | Unique Code mentioned to identify your patient | NT_CLIENT_001 |
visit_id |
Yes | Unique Code mentioned to identify patient current visit | 4659f8eb164a61a025 |
| Patient Bio-Data | |||
prakruti |
No | Patient's prakruti (V: Vata, P: Pitta, K: Kapha, VP: Vata Pitta, VK: Vata Kapha, PV: Pitta Vata, PK: Pitta Kapha, KP: Kapha Pitta, KV: Kapha Vata) |
VK |
age |
Yes | Patient's age in years | 25 |
gender |
Yes | Biological gender (M: Male, F: Female, D: Diverse/Non Binary, N: Prefer not to disclose) |
M |
height |
Yes | Patient's height in centimeters (cm) | 165 |
weight |
Yes | Patient's weight in kilograms (kg) | 80 |
| Capture & Clinical | |||
nadi_capture_type |
No |
Hardware protocol used for capture
(1: Bluetooth, 2: USB).
Default: USB (2) |
1 |
major_symptoms |
No | Comma-separated symptoms list (or 'NA') | NA |
Mobile SDK Integration
For Android applications that prefer an embedded SDK-based integration, follow the setup below. This flow uses a local repository package, Flutter engine initialization, and a MethodChannel call to launch the assessment with patient data.
Before You Start
Download the Android SDK repository package from the shared folder before starting the setup. After downloading, extract the package and keep the required repo folder inside your Android project.
If you prefer app-to-app launch using deep links instead of an embedded SDK flow, refer to the Mobile App Integration section.
Step 1: Integration Setup
Place the required repo folder inside your Android project’s libs/ directory. Then register the local repository path in settings.gradle.kts.
dependencyResolutionManagement {
    repositories {
        google()
        mavenCentral()
        // Ensure this points to the directory containing the repo folder
        maven { url = uri("libs/repo") }
        maven { url = uri("https://storage.googleapis.com/download.flutter.io") }
    }
}
Add the SDK dependencies to your app/build.gradle.kts file.
dependencies {
    debugImplementation("com.example.nadi_capture_sdk:flutter_debug:1.0")
    profileImplementation("com.example.nadi_capture_sdk:flutter_profile:1.0")
    releaseImplementation("com.example.nadi_capture_sdk:flutter_release:1.0")
}
Step 2: Required Permissions & Manifest Configuration
Add the following permissions to your AndroidManifest.xml file outside the <application> tag.
<uses-permission android:name="android.permission.BLUETOOTH" />
<uses-permission android:name="android.permission.BLUETOOTH_ADMIN" />
<uses-permission android:name="android.permission.BLUETOOTH_SCAN" />
<uses-permission android:name="android.permission.BLUETOOTH_CONNECT" />
<uses-permission android:name="android.permission.ACCESS_FINE_LOCATION" />
<uses-permission android:name="android.permission.INTERNET" />
Register FlutterActivity inside the <application> tag.
<activity
    android:name="io.flutter.embedding.android.FlutterActivity"
    android:theme="style=""/Theme.AppCompat.Light.NoActionBar"
    android:configChanges="orientation|keyboardHidden|keyboard|screenSize|locale|layoutDirection|fontScale|screenLayout|density|uiMode"
    android:hardwareAccelerated="true"
    android:windowSoftInputMode="adjustResize" />
Step 3: SDK Initialization & Launch
Initialize the Flutter engine, map the required patient parameters, and launch the SDK activity using the MethodChannel.
// 1. Initialize the engine
val engineId = "nadi_engine"
val flutterEngine = FlutterEngine(context)
flutterEngine.dartExecutor.executeDartEntrypoint(
    DartExecutor.DartEntrypoint.createDefault()
)
FlutterEngineCache.getInstance().put(engineId, flutterEngine)

// 2. Map patient metrics
val patientData = mapOf(
    "user_id" to "USER_ID_HERE",
    "auth_token" to "AUTH_TOKEN_HERE",
    "visit_id" to "VISIT_ID_HERE",
    "client_code" to "CLIENT_CODE_HERE",
    "height" to "HEIGHT",
    "weight" to "WEIGHT",
    "age" to "AGE",
    "gender" to "GENDER",
    "prakruti" to "PRAKRUTI",
    "major_symptoms" to "SYMPTOMS"
)

// 3. Send data and launch the assessment
MethodChannel(flutterEngine.dartExecutor.binaryMessenger, "com.nadi.sdk/channel")
    .invokeMethod("startAssessment", patientData)

startActivity(FlutterActivity.withCachedEngine(engineId).build(context))
Developer Notes
- When the assessment flow completes, the SDK returns the result through the same
MethodChannelusing the method nameassessmentResult. - Please ensure the repository path used in
settings.gradle.ktsmatches the directory structure of your Android project.
Authentication
All API requests must be authenticated. You can get your initial credentials or refresh them if your security has been compromised.
Generate Authentication Token
Here is the utility to generate your authentication token. Please provide your login credentials below. The Credentials will be displayed in the right side box and you can use them while integrating it with your software.
Credentials will appear here.
Regenerate Token
To proceed with regenerating your User Authentication details click on the regenerate button.
New credentials will appear here.
How to use Credentials
Include the following parameters in your HTTPS Request Headers:
user-id: "YOUR_USER_ID"auth-token: "YOUR_AUTH_TOKEN"
Active Credentials
---
---
Onboarding Roadmap
Steps to Full Integration
Follow this clear path to configure your developer environment and begin capturing pulse data.
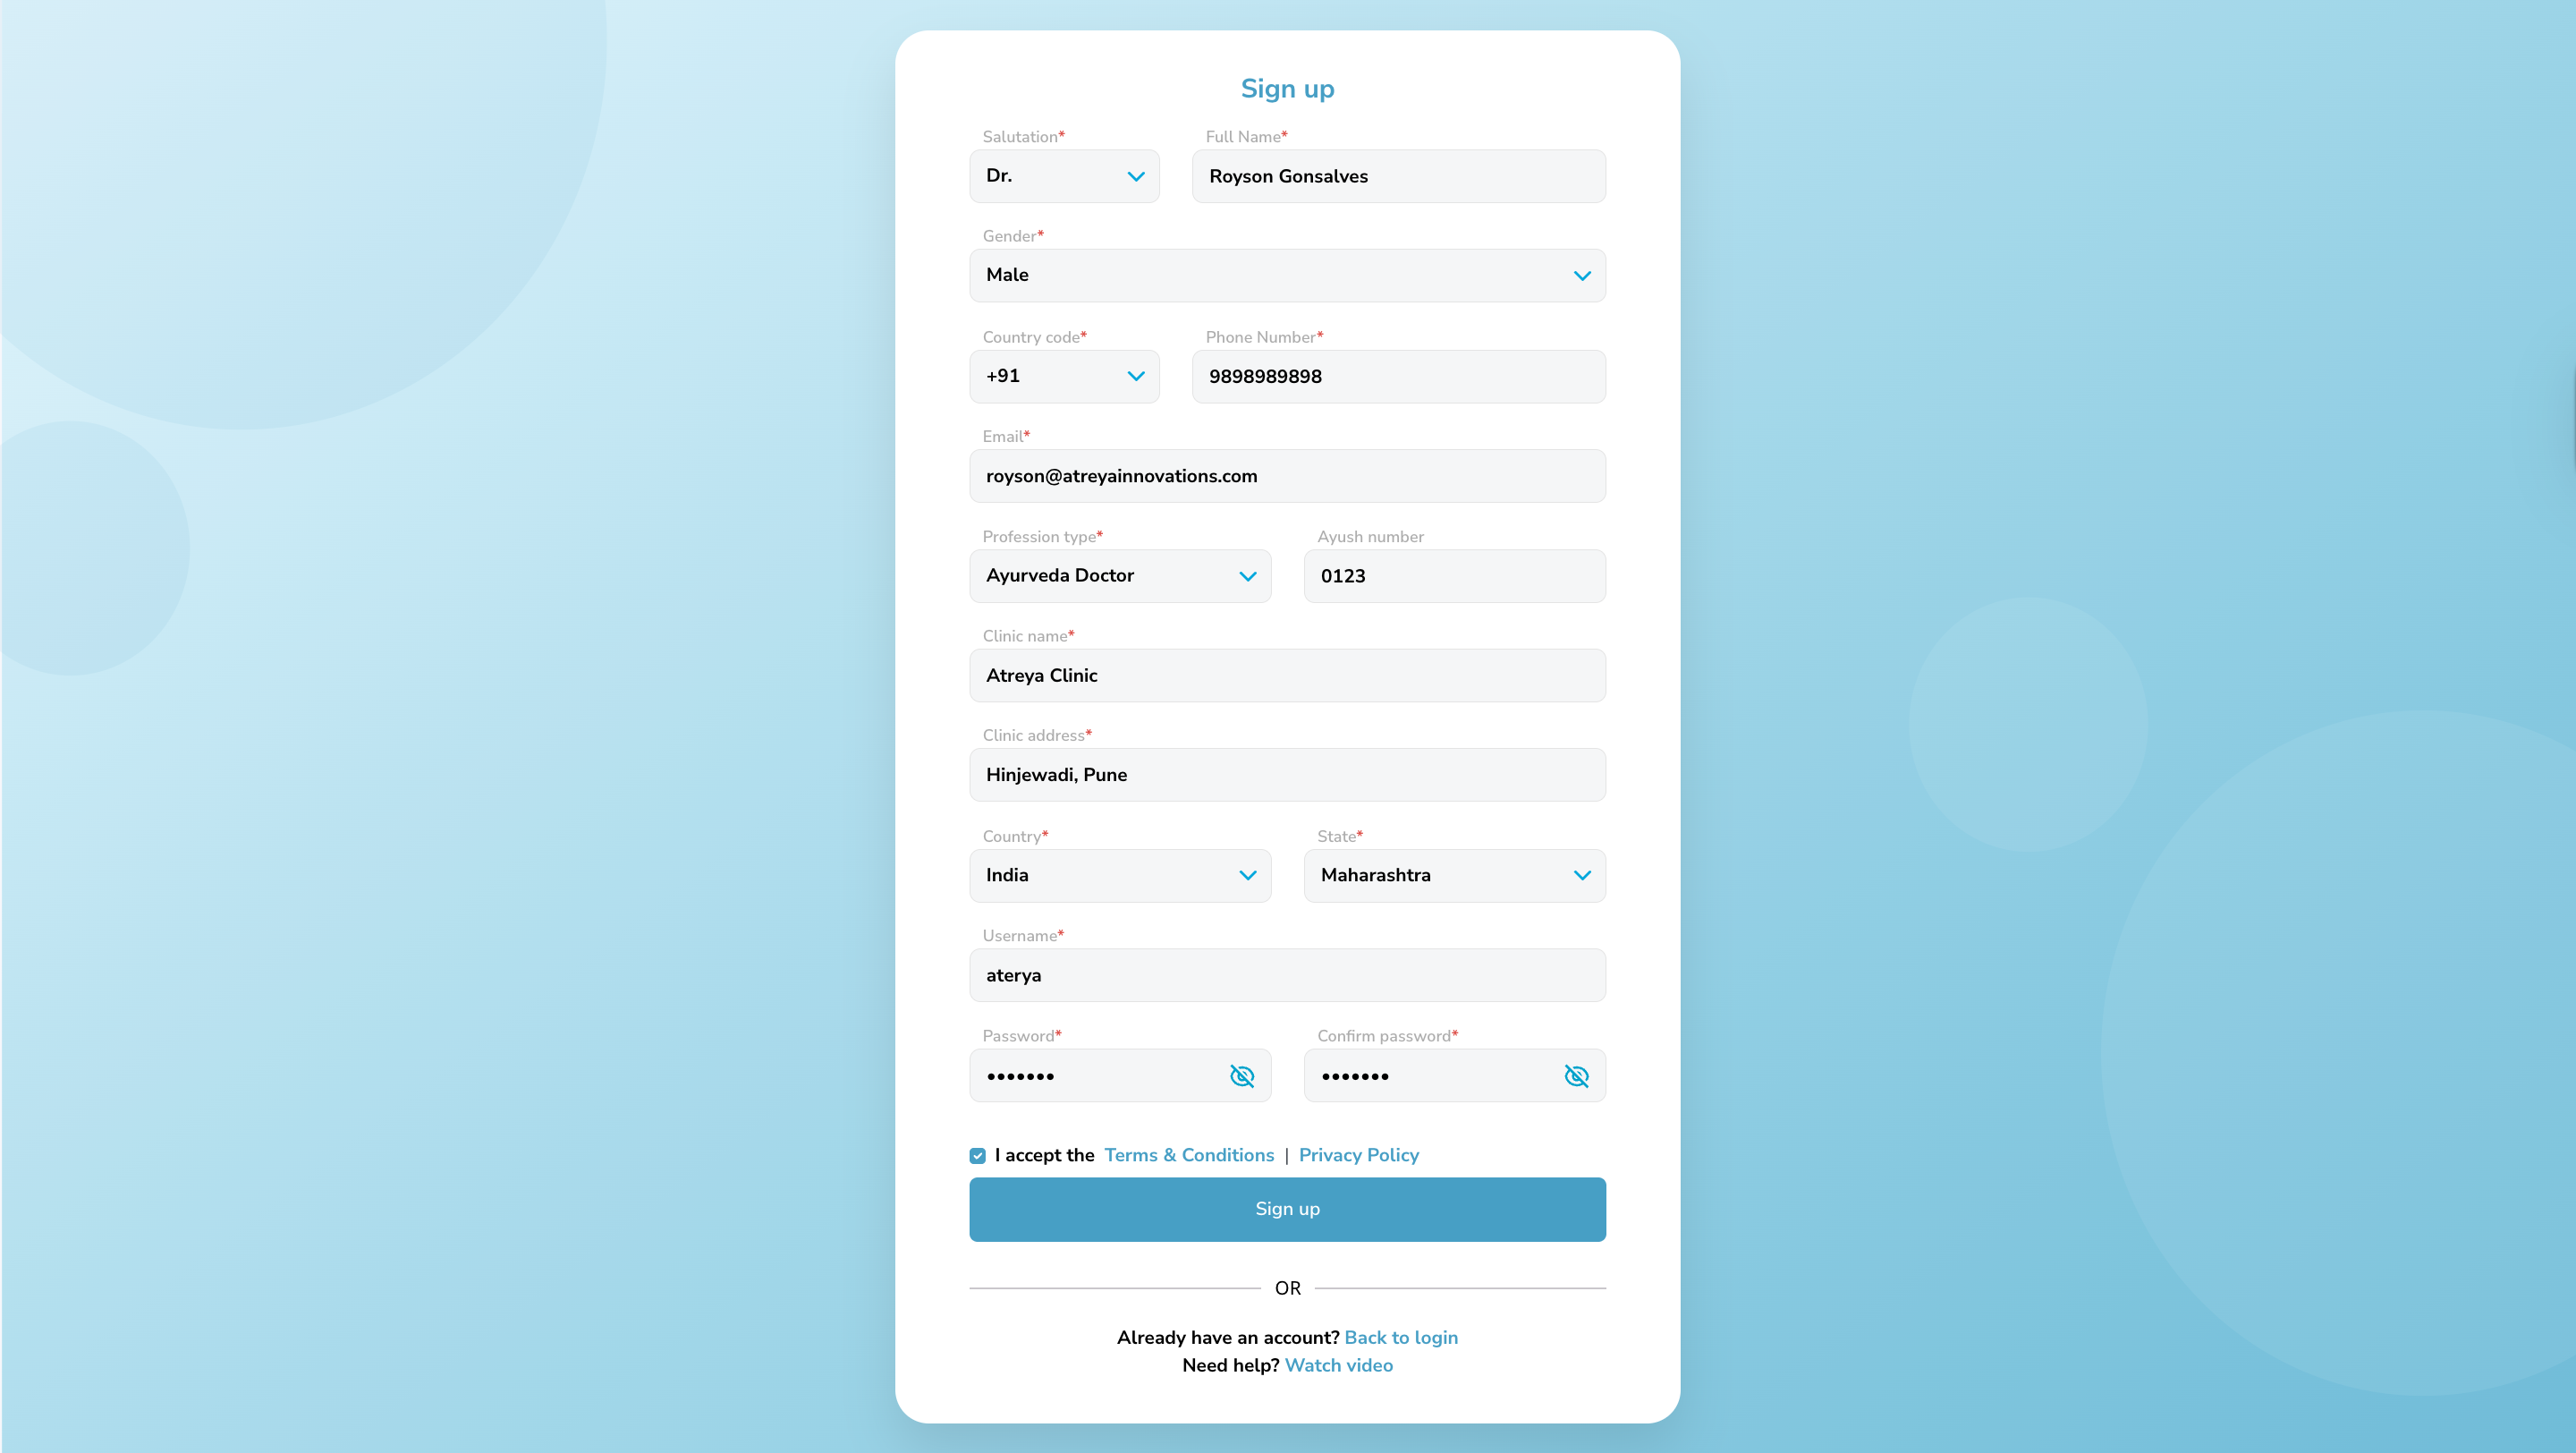
Step 1: Account Registration
To begin the process, the user must register an account on the Nadi Tarangini platform.
Details: Fill the registration form with valid professional and contact details.
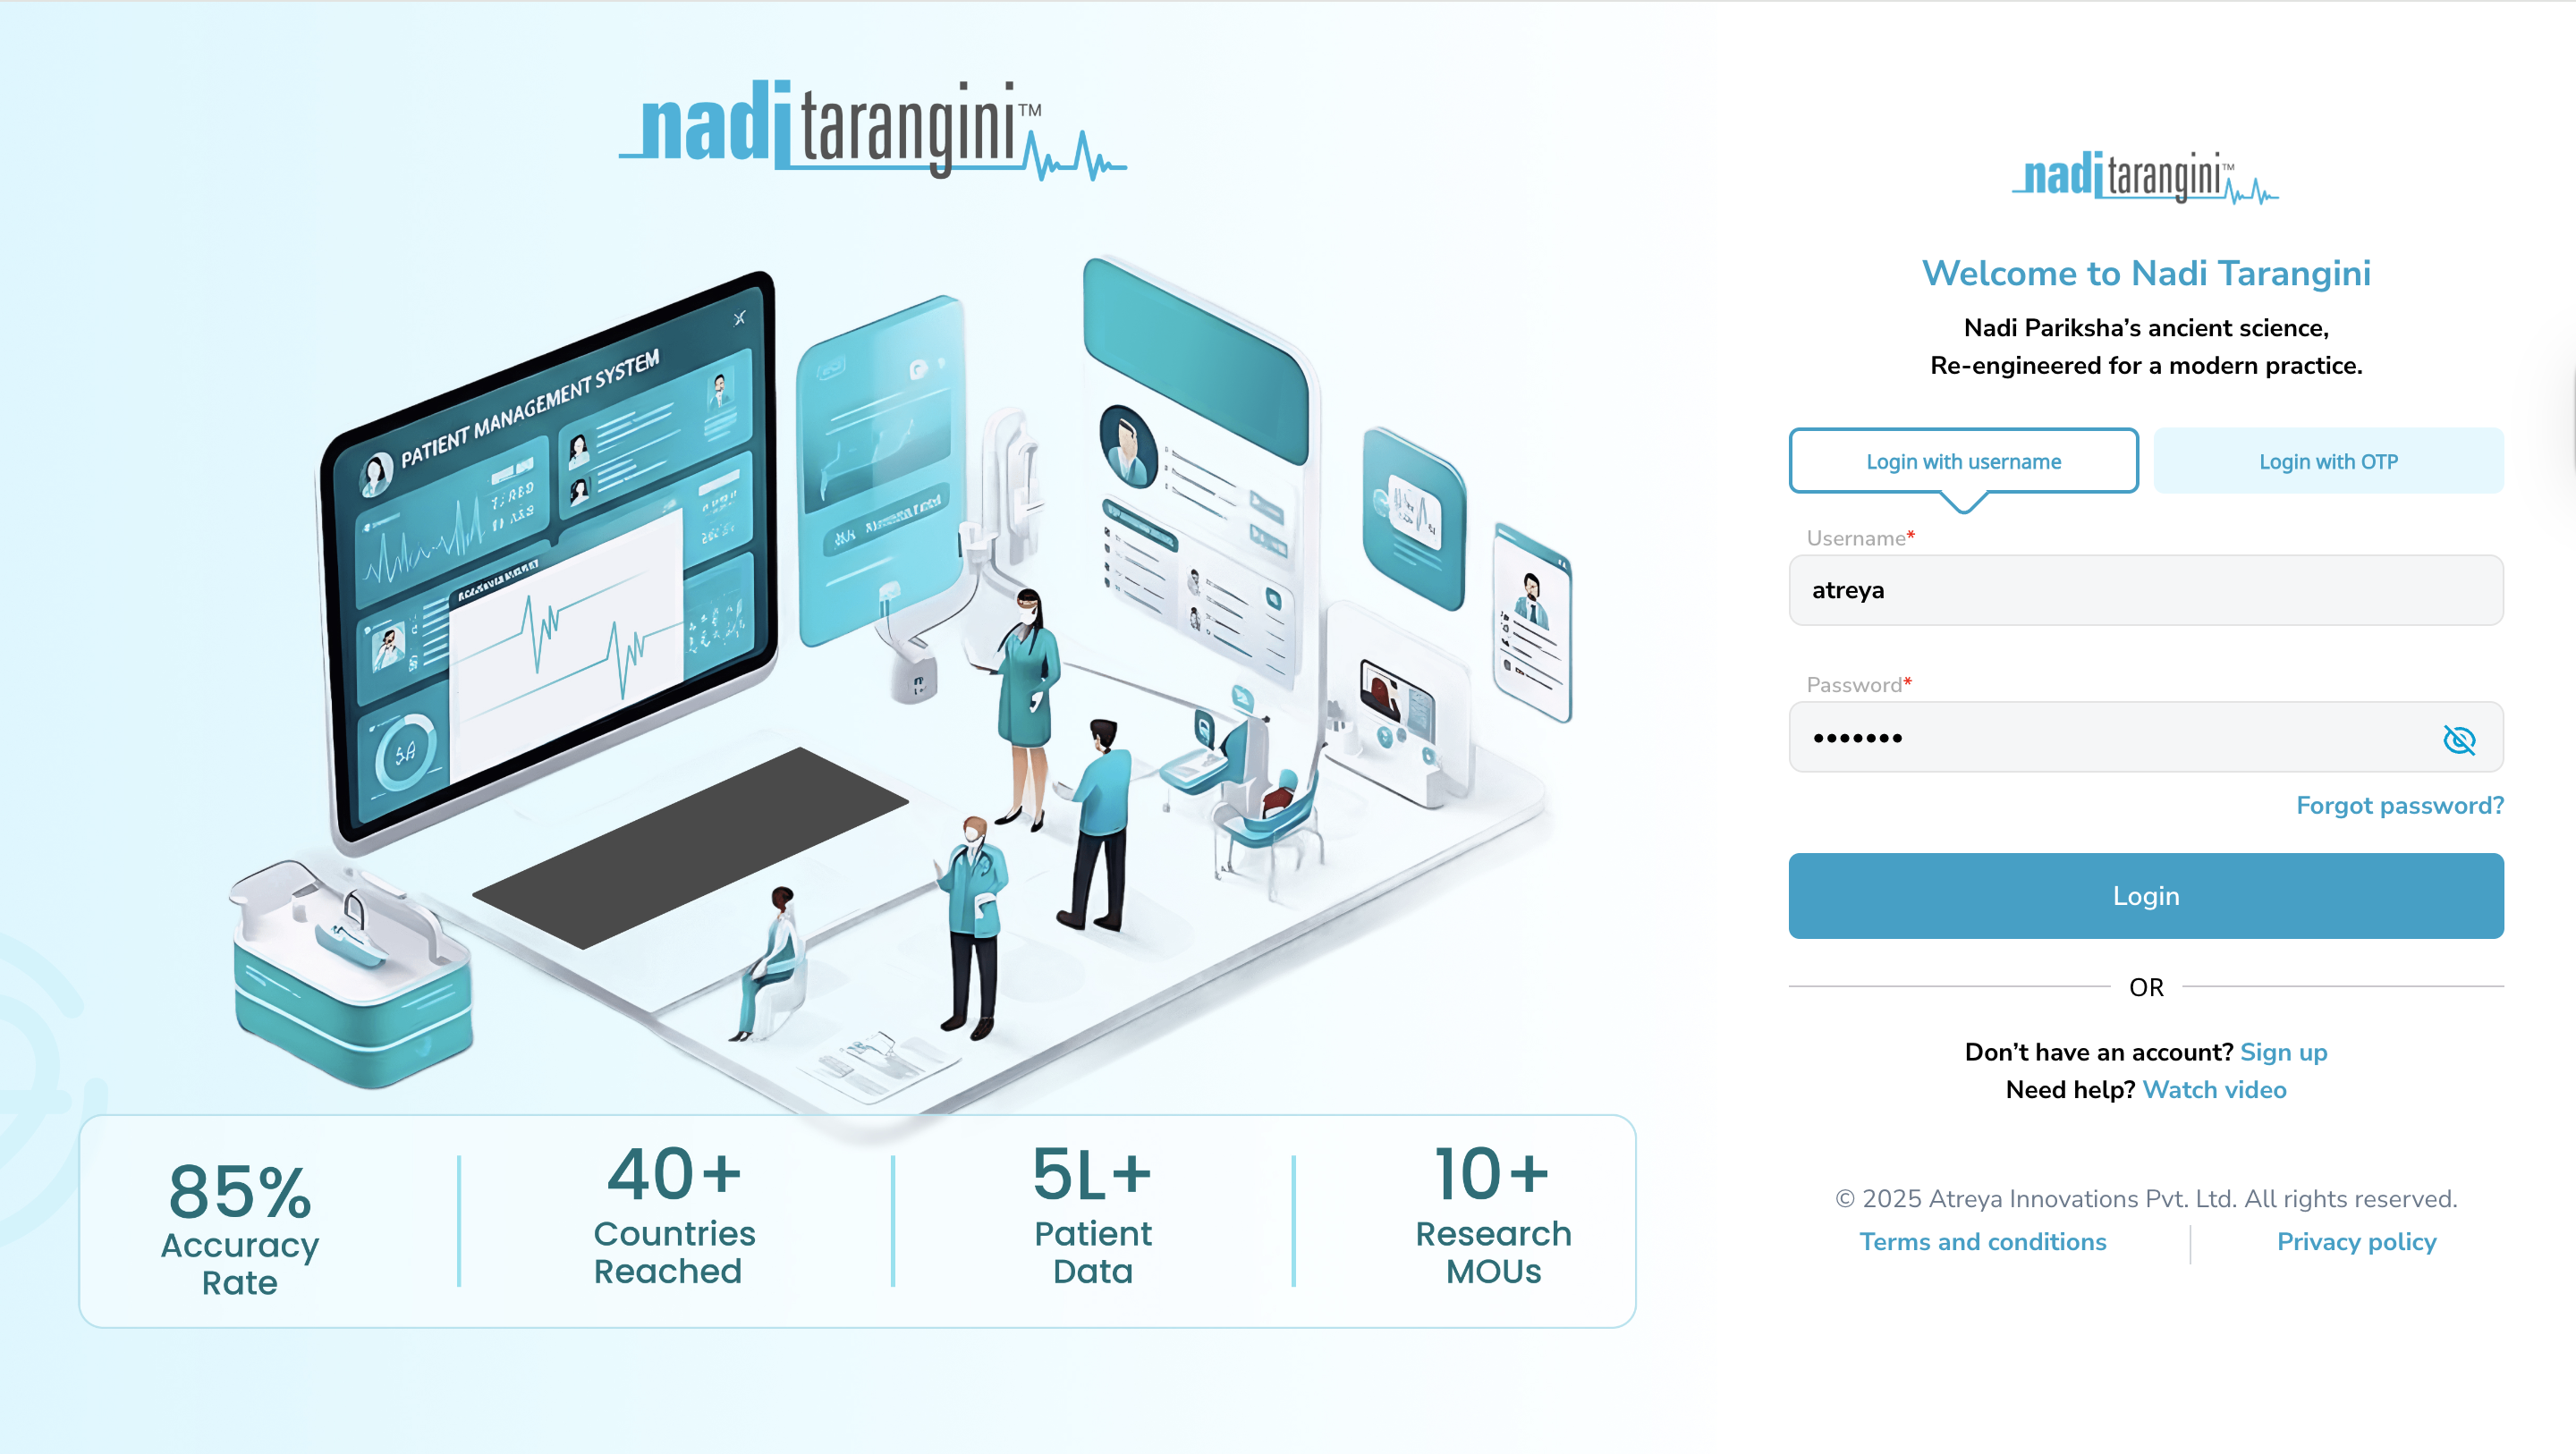
Step 2: User Login
After you completed step 1, you can log in using the credentials you added during sign-up.
Details: Fill the valid credentials to login.
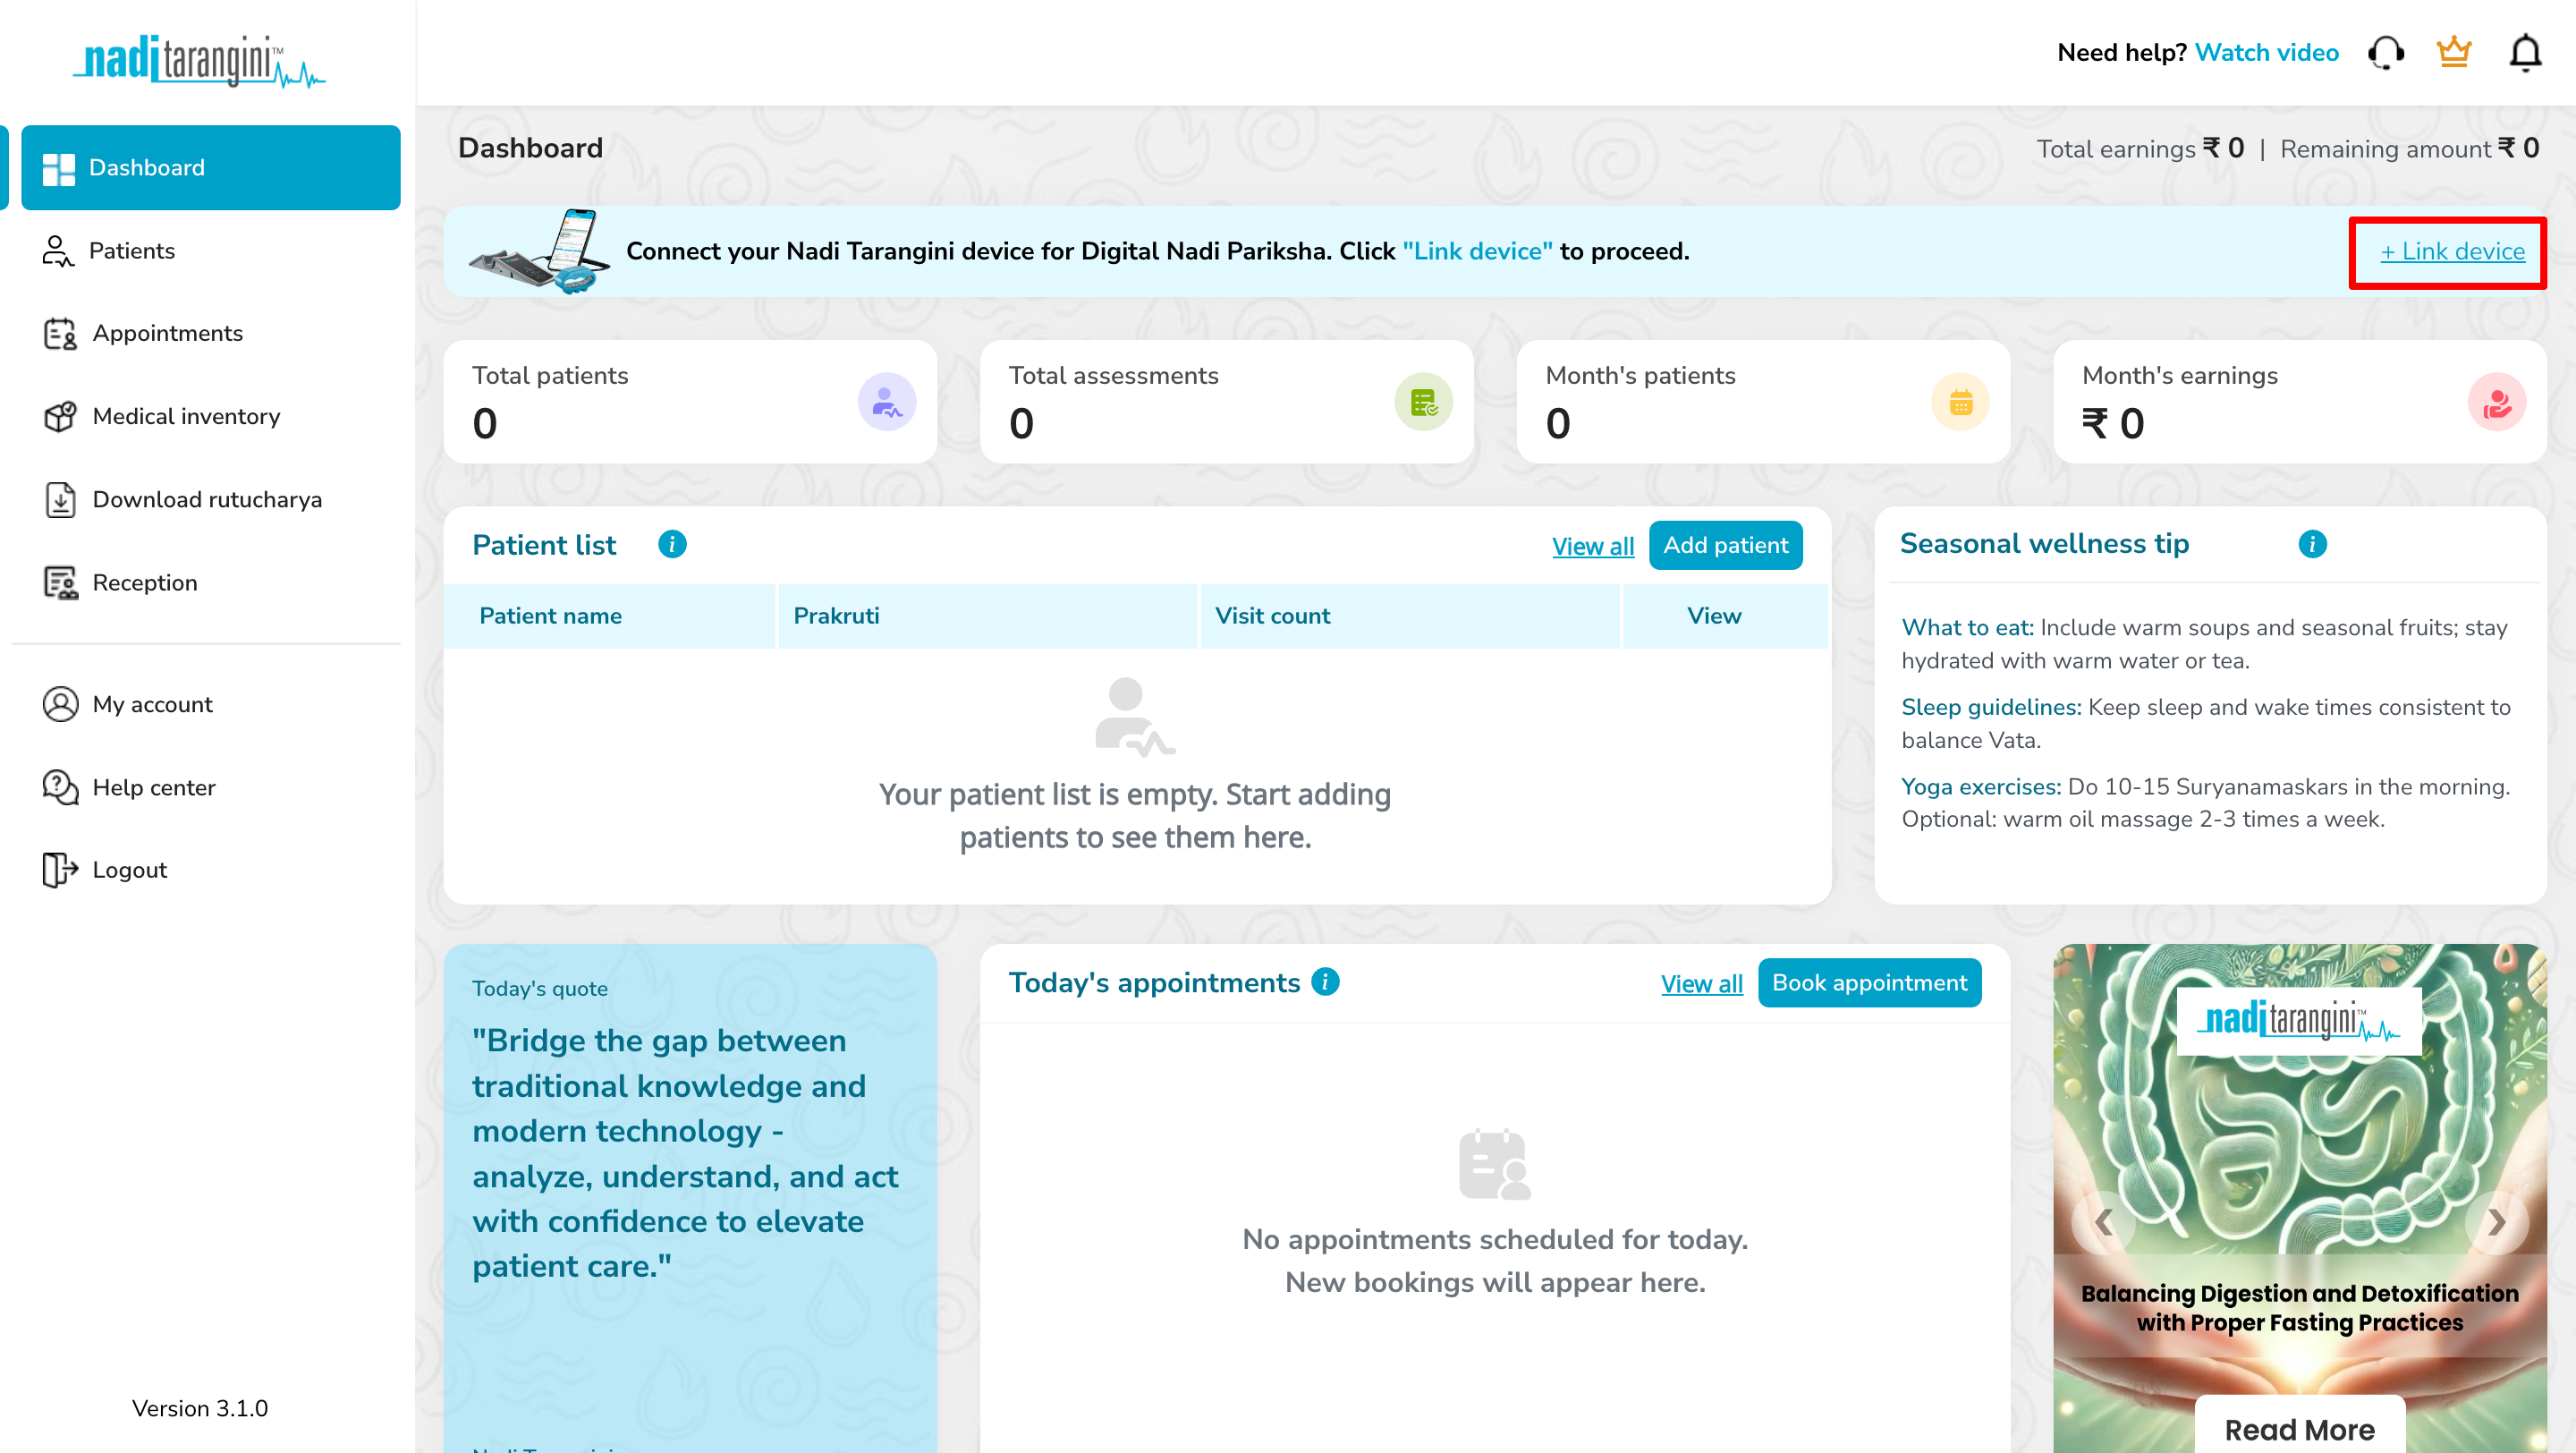
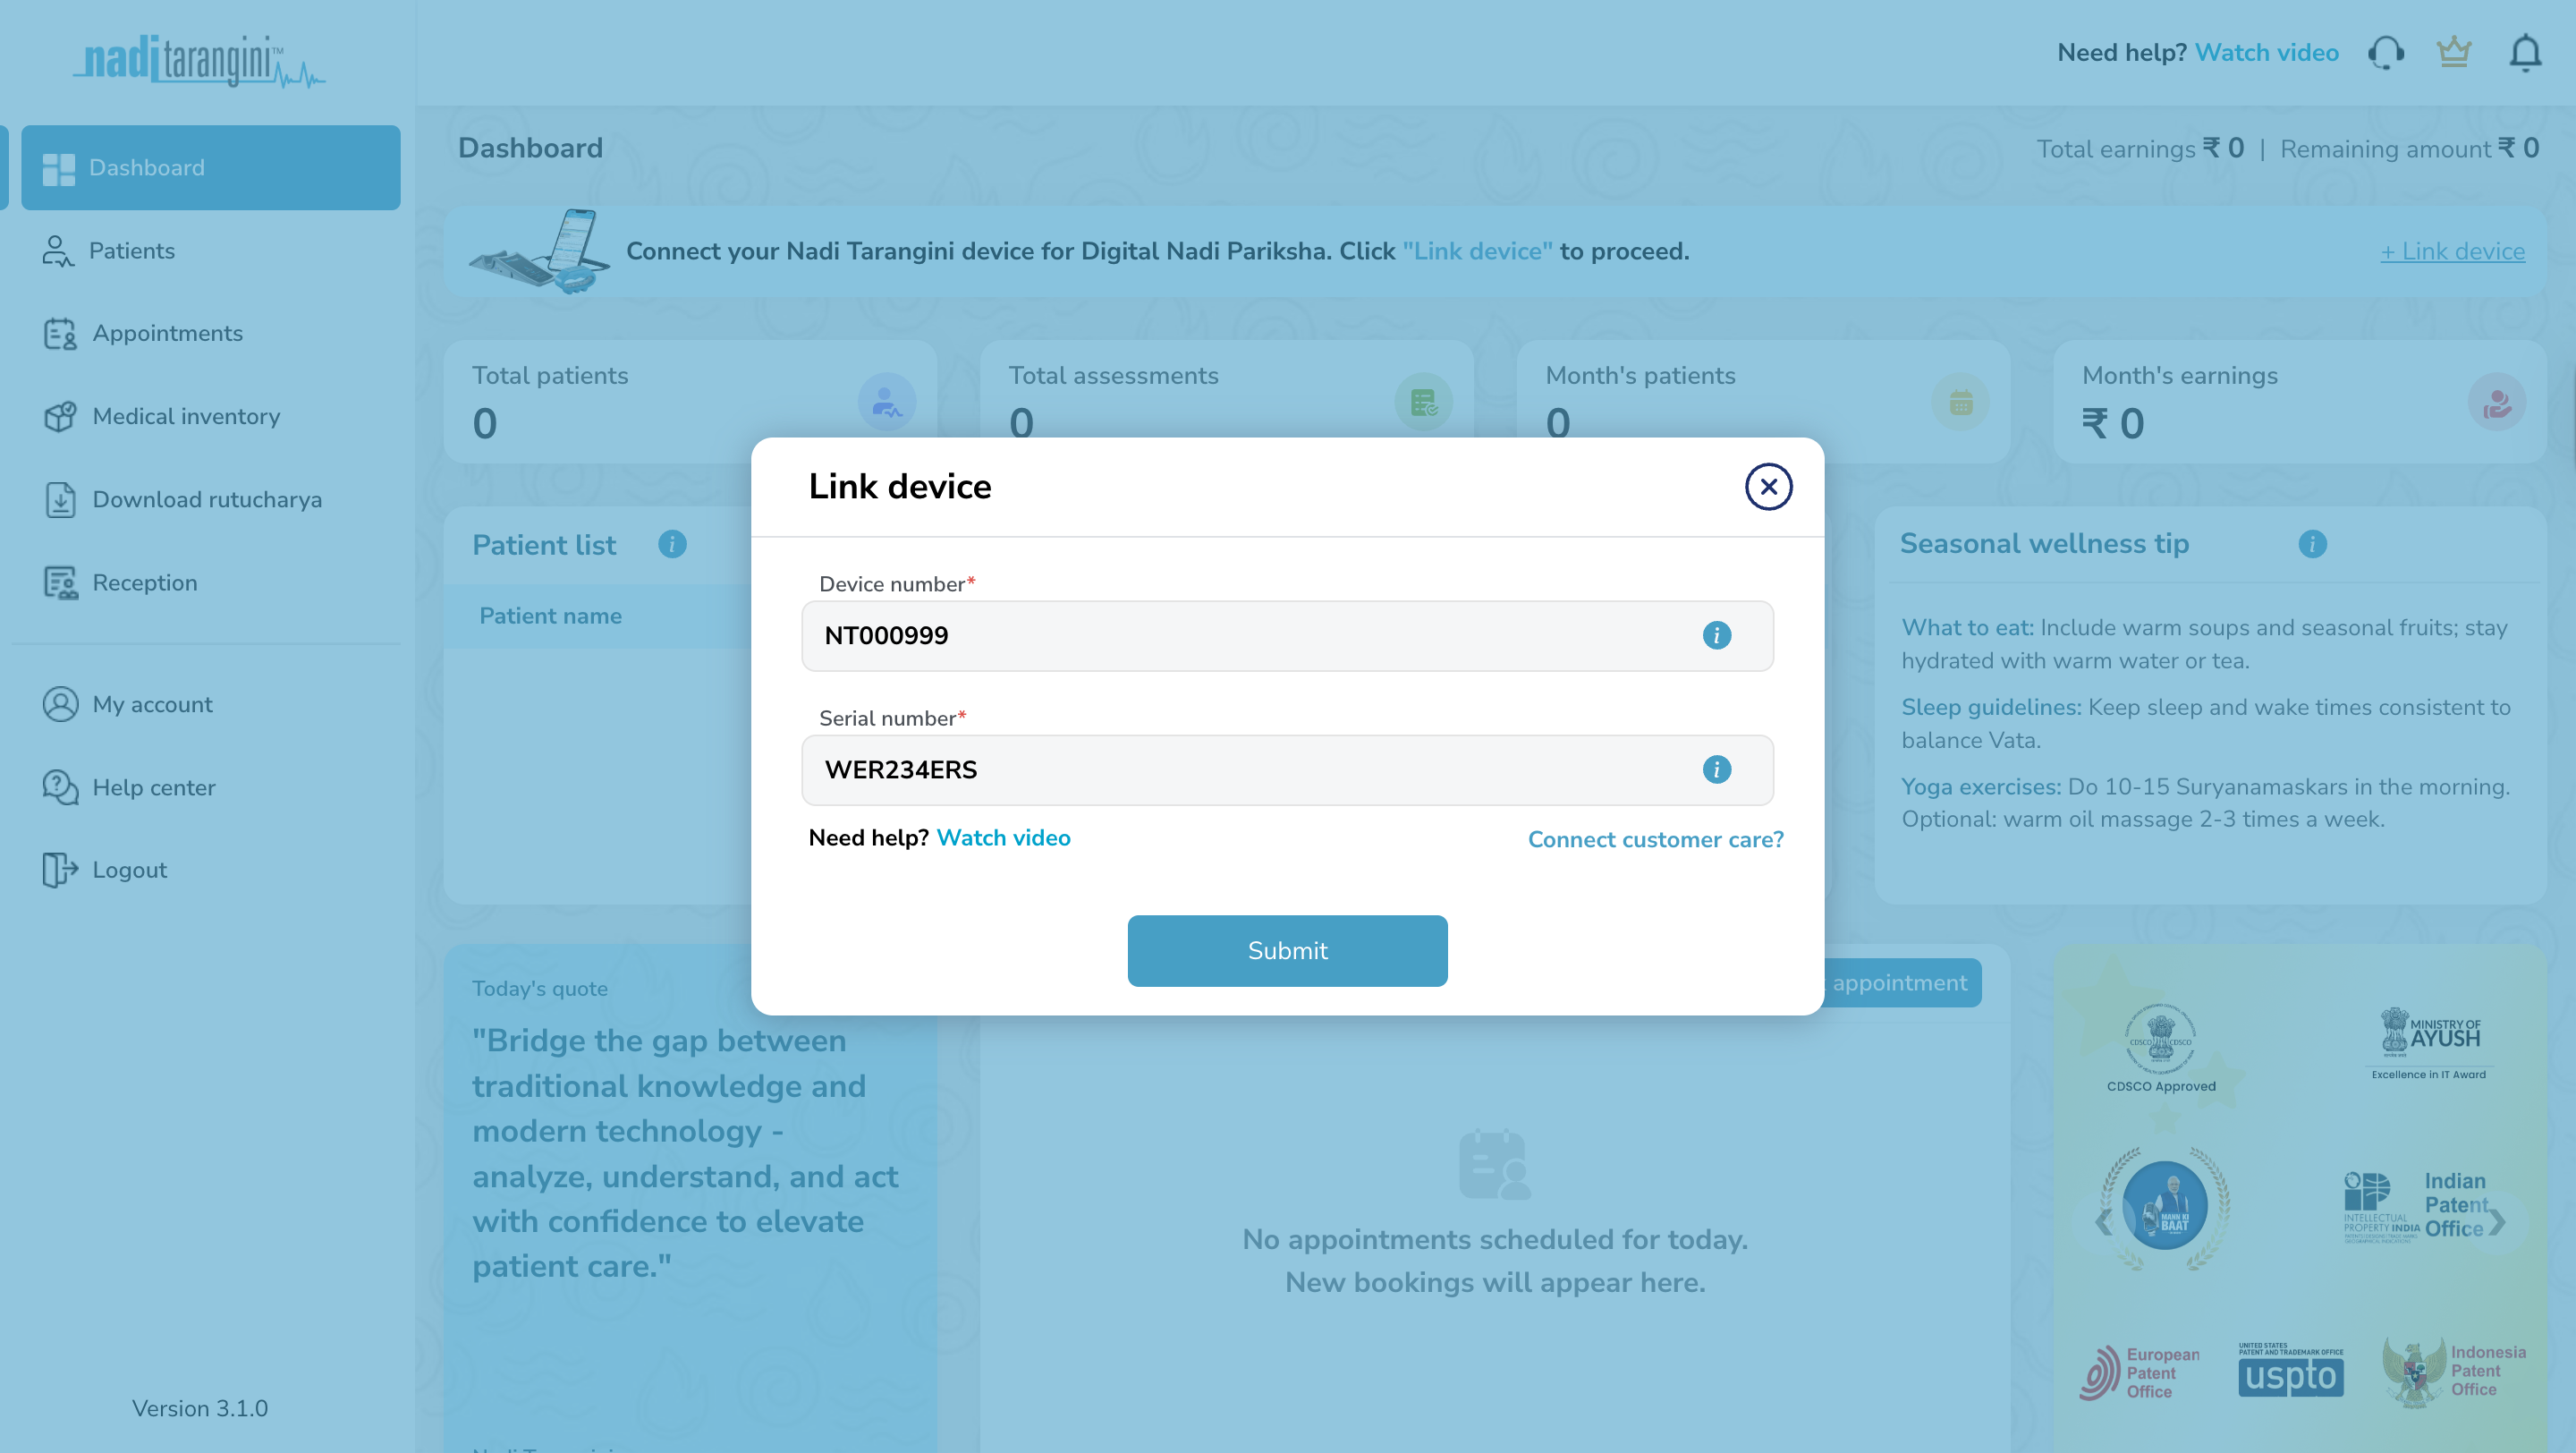
Step 3: Device Linking
Once the account is created, the user must associate their profile with their specific Nadi Tarangini device.
Action: Log in to the portal using the credentials created in Step 2.
Linking: On the dashboard, click on the "Link Device" and fill up the device and serial number mentioned behind the Nadi Tarangini device. (Refer the screenshot)
Step 4: Generate Authentication Token
After you have successfully completed the above steps, you will need to create a valid authentication token. All API requests to Nadi Tarangini Backend must be authenticated using a valid API Token. Following are the steps to generate valid auth token.
Authentication[Optional] Re-Generating User Authentication
If you wish to regenerate the new authentication token later. Following are the steps to regenerate valid auth token.
Re-AuthenticationStep 5: Software Integration Prerequisites
NT Capture can be integrated on desktop and mobile platforms. To select your preferred way, click on the appropriate link below
Web SDK Integration
Contains the Web Link and JS/SDK instructions for browser-based platforms.
Mobile App Integration
Contains the instructions for Android and iOS apps.
Step 6: Fetch User Details
Now your application can capture the Nadi and send it to our backend for analysis. The nadi analysis data is supplied in the JSON format. To fetch this JSON, the following steps are to be followed.
NT Capture
Documentation
NT Capture is the SDK to integrate the Nadi Tarangini service/analytics with your platform. Enable digital pulse diagnosis in your healthcare software with the help of NT Capture. The SDK provides seamless communication between our patented sensors and your clinical applications.
Seamless Integration
NT Capture integrates effortlessly with existing web and application workflows using secure URL parameters. This allows users to launch assessments directly from their system without repeated logins, minimising friction and improving operational efficiency.
Real-Time Data Capture
Pulse signals are captured and processed in real time during the assessment. The system continuously synchronises data to ensure accurate readings, immediate validation, and instant availability for reports and clinical decision-making.
Data Security
NT Capture sessions are protected through authentication tokens and encrypted data transmission. Patient and assessment data are securely handled in compliance with privacy and security best practices, ensuring confidentiality and system integrity at every step.
Parameter Reference
Comprehensive list of parameters used in the SDK authentication and data payload.
| Parameter | Required | Description | Request Value |
|---|---|---|---|
| Authentication & Identity | |||
user_id |
Yes | Practitioner's unique identification number | 12345 |
auth_token |
Yes | Secure API token for session authorization | 25be054659f8eb164a61a02567449899 |
client_code |
Yes | Unique Code mentioned to identify your patient | NT_CLIENT_001 |
visit_id |
Yes | Unique Code mentioned to identify patient current visit | 4659f8eb164a61a025 |
| Patient Bio-Data | |||
prakruti |
No | Patient's prakruti (V: Vata, P: Pitta, K: Kapha, VP: Vata Pitta, VK: Vata Kapha, PV: Pitta Vata, PK: Pitta Kapha, KP: Kapha Pitta, KV: Kapha Vata) |
VK |
age |
Yes | Patient's age in years | 25 |
gender |
Yes | Biological gender (M: Male, F: Female, D: Diverse/Non Binary, N: Prefer not to disclose) |
M |
height |
Yes | Patient's height in centimeters (cm) | 165 |
weight |
Yes | Patient's weight in kilograms (kg) | 80 |
| Capture & Clinical | |||
nadi_capture_type |
No |
Hardware protocol used for capture
(1: Bluetooth, 2: USB).
Default: USB (2) |
1 |
major_symptoms |
No | Comma-separated symptoms list (or 'NA') | NA |
Webhook Notifications
Receive a server-to-server notification after a nadi capture is completed successfully. Each delivery is sent as a JSON POST request and can be protected with a shared webhook secret.
Webhook Event Overview
After the SDK flow finishes with a successful nadi capture, NT Capture can send the following JSON payload to the webhook URL configured for the account. This notification is intended to help your application recognise that the capture has been completed. It does not include the full analysis report.
data.visit_id from the payload and use it with the Analysis & Reports APIs to request the detailed results.Important Notes
- This webhook is intended for technical integration and operational notification purposes.
- The webhook payload does not include the detailed report data or PDF assets.
- All identifiers, URLs, timestamps, and codes shown on this page are illustrative examples for documentation only.
- The receiving endpoint should be operated and secured by the client in their own environment.
- The receiving application is responsible for securing, storing, and processing webhook data according to its own compliance, privacy, and operational requirements.
- If a webhook secret is configured, each delivery includes signed security headers so the receiving application can verify authenticity before processing.
- Validation checks on this page help confirm basic format and reachability only. They do not guarantee future delivery, endpoint behaviour, or business-level acceptance.
View Existing Webhook Configuration
Use your current authenticated credentials to view the webhook URL and whether a webhook secret is currently configured for your NT Capture account.
The currently configured webhook setup will appear here.
Update Webhook Configuration
Provide your authenticated credentials, the destination URL, and a shared secret for signed webhook notifications when required. Before the update is accepted, NT Capture performs a preliminary check of URL format and basic reachability.
https://, should point to a publicly reachable endpoint under your control, and is checked for basic server reachability before the update is accepted. A webhook secret is strongly recommended so the receiving application can verify the signature of each delivery.
The saved webhook setup and preliminary validation result will appear here.
Illustrative Success Webhook Payload
{
  "event": "nadi.capture.completed",
  "status": true,
  "status_code": "NT_3111",
  "message": "Nadi captured successfully",
  "occurred_at": "2026-05-26T14:30:45+05:30",
  "data": {
    "client_code": "NT_CLIENT_001",
    "visit_id": "4659f8eb164a61a025",
    "capture_status": "completed",
    "captured_at": "2026-05-26T14:30:45+05:30"
  }
}
Illustrative Delivery Headers
POST /webhooks/nt-capture HTTP/1.1
Content-Type: application/json
X-External-Webhook-Event: nadi.capture.completed
X-External-Webhook-Delivery: 3c3d89a3-2a8b-4b89-a7d7-24f54fd3f6f2
X-External-Webhook-Timestamp: 1780093845
X-External-Webhook-Signature: sha256=7a363f44ca5a4cc9844e0d41450f2d917d1eb9cd4f6b5fbdbad58caee5a1d9d2
When a webhook secret is configured, compute the HMAC SHA-256 signature over <timestamp>.<raw-request-body> and compare it with X-External-Webhook-Signature before processing the payload.
How The Webhook Secret Works
The webhook secret is a shared security value between your system and NT Capture. It helps your application confirm that a webhook request genuinely came from NT Capture and was not sent by an unknown third party.
When you enter a webhook secret in the configuration form, NT Capture stores it securely in encrypted form. For security reasons, the original plain-text secret is not shown again in the documentation UI or returned by the configuration APIs after it has been saved.
To avoid copy-paste issues across different systems and languages, use only standard English keyboard characters in the webhook secret. A UUID-style secret such as ae64117f-b299-433e-86aa-543787ca0c4b is a good example.
- Create a strong secret in your own system and store it safely.
- Enter that same secret once in NT Capture while configuring the webhook.
- Keep your original secret securely on your side because it will not be shown again later.
- If the secret is ever lost or needs to be changed, save a new secret and update your receiving system to use the new value.
- Stores the secret securely in encrypted form for internal use.
- Uses the stored secret internally to generate the webhook signature for every delivery.
- Returns only the webhook URL and whether a secret is configured.
- Never exposes the original secret again through the documentation screen or configuration response.
Simple Verification Flow
- Receive the webhook request on your endpoint.
- Read the
X-External-Webhook-Timestampheader. - Read the raw request body exactly as received.
- Compute an HMAC SHA-256 signature using
<timestamp>.<raw-request-body>and your original saved secret. - Compare your calculated value with
X-External-Webhook-Signature. - Process the webhook only if the signature matches.
Webhook Secret Rules
- If no webhook secret is currently configured, entering a secret is required before the webhook setup can be saved.
- If a secret is already configured, leaving the secret field blank keeps the existing secret unchanged.
- For security reasons, NT Capture never displays the original secret again after it has been saved.
- Your team should save the original secret securely in your own system because it is needed later for webhook verification.
- Use only standard English keyboard characters without spaces. A value such as
ae64117f-b299-433e-86aa-543787ca0c4bis a good format.
Client Verification Checklist
- Accept the webhook only through your own secure
https://endpoint. - Read the security headers sent by NT Capture:
X-External-Webhook-Event,X-External-Webhook-Delivery,X-External-Webhook-Timestamp, andX-External-Webhook-Signature. - Reject webhook requests where
X-External-Webhook-Timestampis too old, for example older than 5 minutes, to reduce replay risk. - Compute the HMAC SHA-256 signature using
<timestamp>.<raw-request-body>and your original saved secret. - Compare your computed value with
X-External-Webhook-Signaturebefore accepting the payload. - Process the webhook only if the signature matches. If it does not match, treat the request as untrusted.
Operational Notes
- This webhook is a completion notification only. It does not contain the full report or PDF data.
- Use
data.visit_idfrom the webhook payload when you need to call the Analysis & Reports APIs for detailed results. - Webhook deliveries may be retried or received more than once. Use
X-External-Webhook-Deliveryas a unique delivery identifier and make your processing idempotent. - If your team changes the webhook secret in NT Capture, update the same new secret in your receiving system immediately.
- If your team ever loses the original secret, create and save a new secret instead of trying to recover the old one.
- The encrypted value that may appear in internal storage is for secure storage only and must not be used for signature verification.
Payload Field Reference
The table below explains what each field represents and how it may be used by the receiving application.
| Field | Type | Required | Description | Example Value |
|---|---|---|---|---|
event |
string |
Yes | Identifier for the notification type. | nadi.capture.completed |
status |
boolean |
Yes | Indicates whether the notification refers to a successful capture event. | true |
status_code |
string |
Yes | Application status code associated with this notification. This may be stored for logging or operational reference. | NT_3111 |
message |
string |
Yes | Short human-readable summary of the notification. | Nadi captured successfully |
occurred_at |
string |
Yes | Timestamp representing when the notification record was created. The value is provided in ISO 8601 format. | 2026-05-26T14:30:45+05:30 |
data |
object |
Yes | Container object holding the visit-specific details included in the notification. | {...} |
data.client_code |
string |
Yes | Client-side identifier that may be used to map the notification to the corresponding patient or visit in the receiving system. | NT_CLIENT_001 |
data.visit_id |
string |
Yes | Unique visit identifier for the completed capture. This is typically the primary value used when calling the report APIs. | 4659f8eb164a61a025 |
data.capture_status |
string |
Yes | Capture state for the event being reported. In the illustrated success flow, the value is completed. |
completed |
data.captured_at |
string |
Yes | Timestamp showing when the nadi capture was completed. The value is provided in ISO 8601 format. | 2026-05-26T14:30:45+05:30 |
How Client Systems Should Use It
- Store
data.visit_idanddata.client_codeso the notification can be associated with the correct record in your system. - Use
status_codeandmessagefor logging, monitoring, or operational tracking as appropriate for your environment. - Parse
occurred_atanddata.captured_atas standard ISO 8601 timestamps. - Use the report APIs after receiving this notification if your application requires the detailed analysis output.
Simple Integration Flow
- Launch the capture flow using the Web SDK integration.
- Receive the success webhook on the configured destination URL.
- Read
data.visit_idfrom the webhook payload. - Use that
visit_idto call the Analysis & Reports APIs when the detailed report data is required.
Current Webhook Setup
---
Webhook Setup Updated
---
Analysis & Reports API
Retrieve detailed pulse analysis data using a specific visit_id.
Using this API after the webhook
The webhook success payload is a lightweight completion notification. Once your system receives the webhook and reads data.visit_id, use the APIs on this page to fetch the full analysis and report data.
Get Nadi Guna Analysis Data
https://api.ashoka.world/nt-capture/report/nadi-guna/{visit_id}GET /nt-capture/report/nadi-guna/{visit_id}
curl -H "user-id: YOUR_ID" \
     -H "auth-token: YOUR_TOKEN" \
https://api.ashoka.world/nt-capture/report/nadi-guna/{visit_id}import requests
headers = {
"user-id": "YOUR_ID",
"auth-token": "YOUR_TOKEN"
}
response = requests.get(
"https://api.ashoka.world/nt-capture/report/nadi-guna/{visit_id}",
headers=headers
)const axios = require('axios');
axios.get(
'https://api.ashoka.world/nt-capture/report/nadi-guna/' + visitId,
{
headers: {
'user-id': 'YOUR_ID',
'auth-token': 'YOUR_TOKEN'
}
}
);$response = Http::withHeaders([
'user-id' => 'YOUR_ID',
'auth-token' => 'YOUR_TOKEN'
])->get('https://api.ashoka.world/nt-capture/report/nadi-guna/' . $visit_id);HttpRequest request = HttpRequest.newBuilder()
.uri(URI.create("https://api.ashoka.world/nt-capture/report/nadi-guna/" + visitId))
.header("user-id", "YOUR_ID")
.header("auth-token", "YOUR_TOKEN")
.GET()
.build();url := "https://api.ashoka.world/nt-capture/report/nadi-guna/" + visitId
req, _ := http.NewRequest("GET", url, nil)
req.Header.Add("user-id", "YOUR_ID")
req.Header.Add("auth-token", "YOUR_TOKEN")uri = URI("https://api.ashoka.world/nt-capture/report/nadi-guna/#{visit_id}")
request = Net::HTTP::Get.new(uri)
request['user-id'] = 'YOUR_ID'
request['auth-token'] = 'YOUR_TOKEN'var client = new HttpClient();
client.DefaultRequestHeaders.Add("user-id", "YOUR_ID");
client.DefaultRequestHeaders.Add("auth-token", "YOUR_TOKEN");
var response = await client.GetAsync(
$"https://api.ashoka.world/nt-capture/report/nadi-guna/{visitId}"
);import 'package:http/http.dart' as http;
final response = await http.get(
Uri.parse(
'https://api.ashoka.world/nt-capture/report/nadi-guna/$visitId'
),
headers: {
'user-id': 'YOUR_ID',
'auth-token': 'YOUR_TOKEN'
}
);val client = OkHttpClient()
val request = Request.Builder()
.url("https://api.ashoka.world/nt-capture/report/nadi-guna/$visitId")
.addHeader("user-id", "YOUR_ID")
.addHeader("auth-token", "YOUR_TOKEN")
.build()
val response = client.newCall(request).execute()let url = URL(
string: "https://api.ashoka.world/nt-capture/report/nadi-guna/\(visitId)"
)!
var request = URLRequest(url: url)
request.httpMethod = "GET"
request.setValue("YOUR_ID", forHTTPHeaderField: "user-id")
request.setValue("YOUR_TOKEN", forHTTPHeaderField: "auth-token")
URLSession.shared.dataTask(with: request).resume(){
"status": true,
"status_code": "NT_2501",
"message": "Success",
"data": {
"Report-Data": {
"Pulse-Rate": 111,
"Rhythm-Text": "Regular",
"Sama-Nirama-Text": "Nirama",
"Manda-Vegavati-Text": "Vegawati",
"Height": 172,
"Weight": 83,
"Big-Data": {
"Vata": {
"Data": [
1565,1574,1582,1604,1697,1919,2204,2400,2435,2331,2150,1953,1774,1622,1508,1433,1390,1372,1377,1396,1417,1441,1472,1498,1513,1525,1531,1536,1548,1567,1587,1600,1608,1612,1611,1603,1603,1619,1637,1646,1646,1640,1636,1639,1643,1640,1639,1644,1645,1638,1622,1602,1586,1572,1555,1536,1519,1504,1483,1465,1468,1533,1726,2032,2308,2434,2402,2263,2073,1879,1713,1590,1503,1443,1408,1400,1408,1427,1447,1461,1473,1481,1489,1500,1508,1515,1534,1557,1563,1559,1555,1552,1555,1566,1577,1582,1580,1579,1583,1593,1604,1609,1612,1612,1608,1602,1601,1608,1619,1632,1644,1646,1636,1618,1606,1604,1599,1589,1577,1574,1621,1783,2054,2316,2452,2443,2322,2142,1956,1800,1689,1616,1568,1540,1529,1530,1537,1552,1565,1570,1572,1576,1585,1591,1581,1555,1529,1517,1526,1546,1560,1563,1561,1562,1563,1564,1569,1573,1565,1546,1528,1519,1519,1521,1518,1510,1497,1492,1502,1517,1526,1533,1542,1548,1555,1573,1594,1597,1585,1576,1585,1664,1859,2112,2290,2332,2253,2092,1898,1718,1576,1479,1423,1389,1367,1364,1367,1363,1357,1361,1374,1392,1410,1420,1427,1441,1457,1465,1467,1472,1479,1488,1500,1520,1546,1579,1614,1635,1638,1634,1635,1641,1653,1669,1692,1716,1731,1732,1730,1730,1726,1720,1723,1730,1733,1735,1737,1728,1706,1690,1694,1729,1820,1956,2069,2106,2065,1978,1877,1780,1703,1653,1627,1613,1607,1611,1626,1639,1639,1636,1642,1648,1642,1632,1626,1619,1608,1598,1588,1579,1577,1580,1585,1592,1598,1600,1604,1619,1642,1657,1654,1638,1617,1592,1576,1581,1596,1604,1602,1600,1604,1617,1637,1660,1686,1717,1743,1756,1753,1732,1713,1723,1772,1829,1855,1832,1770,1693,1620,1557,1502,1464,1446,1448,1459,1472,1489,1511,1529,1546,1572,1600,1625,1640,1638,1624,1612,1603,1590,1565,1530,1493,1453,1418,1405,1410,1411,1399,1380,1358,1336,1322,1330,1356,1388,1424,1452,1465,1477,1499,1533,1584,1639,1679,1708,1733,1748,1758,1785,1835,1896,1948,1967,1943,1888,1824,1764,1719,1693,1681,1676,1679,1691,1700,1701,1698,1696,1700,1711,1716,1713,1709,1714,1737,1769,1789,1793,1791,1790,1796,1803,1802,1794,1780,1753,1713,1677,1649,1626,1603,1575,1545,1527,1524,1529,1543,1566,1587,1597,1596,1592,1593,1601,1626,1686,1780,1871,1918,1907,1855,1790,1735,1700,1686,1684,1686,1687,1686,1681,1668,1650,1628,1598,1572,1553,1531,1504,1485,1480,1486,1493,1497,1497,1499,1511,1528,1535,1531,1523,1517,1512,1516,1528,1537,1542,1548,1551,1550,1545,1538,1532,1531,1540,1542,1526,1506,1503,1526,1595,1729,1893,2013,2048,2008,1916,1801,1700,1632,1584,1535,1489,1455,1430,1415,1407,1405,1408,1411,1412,1419,1428,1433,1442,1464,1498,1536,1565,1579,1587,1602,1623,1644,1658,1667,1673,1678,1686,1695,1703,1715,1732,1747,1757,1764,1765,1754,1734,1716,1705,1697,1703,1761,1897,2065,2186,2222,2178,2075,1952,1845,1759,1691,1642,1607,1586,1578,1577,1571,1554,1531,1517,1519,1527,1533,1539,1554,1576,1587,1584,1567,1538,1515,1507,1509,1512,1518,1526,1530,1527,1525,1526,1540,1567,1591,1601,1595,1580,1565,1555,1552,1555,1565,1576,1608,1720,1931,2161,2310,2347,2292,2184,2065,1954,1855,1771,1705,1666,1652,1649,1649,1651,1648,1632,1605,1585,1576,1560,1526,1479,1433,1394,1358,1327,1296,1269,1253,1249,1249,1247,1247,1260,1291,1330,1375,1423,1458,1476,1483,1485,1482,1476,1462,1433,1397,1375,1376,1423,1555,1763,1971,2107,2145,2096,1996,1888,1794,1717,1651,1587,1531,1493,1485,1505,1540,1577,1609,1639,1667,1691,1704,1709,1710,1717,1732,1743,1745,1740,1729,1716,1713,1728,1750,1763,1762,1755,1740,1716,1693,1676,1661,1649,1639,1633,1631,1635,1640,1641,1640,1640,1652,1690,1786,1951,2129,2246,2267,2199,2075,1935,1812,1721,1660,1623,1606,1594,1578,1557,1540,1533,1536,1550,1560,1554,1537,1520,1508,1499,1500,1509,1514,1508,1498,1492,1488,1481,1472,1461,1449,1442,1440,1440,1442,1449,1453,1446,1435,1427,1420,1419,1421,1414,1395,1380,1400,1506,1728,2008,2234,2332,2294,2164,2001,1850,1730,1645,1579,1526,1492,1474,1461,1442,1427,1435,1457,1475,1492,1511,1519,1521,1531,1555,1581,1599,1610,1614,1609,1603,1595,1589,1596,1612,1622,1618,1604,1587,1577,1573,1570,1570,1576,1576,1570,1563,1553,1539,1533,1553,1625,1793,2050,2308,2475,2508,2421,2263,2088,1928,1801,1703,1631,1580,1549,1534,1524,1508,1480,1451,1436,1435,1442,1451,1459,1462,1465,1467,1472,1487,1500,1501,1498,1500,1505,1514,1521,1521,1520,1523,1533,1544,1549,1555,1563,1567,1561,1547,1532,1523,1519,1515,1511,1510,1543,1668,1922,2245,2512,2628,2580,2414,2202,2006,1854,1746,1675,1630,1597,1567,1536,1508,1484,1466,1457,1457,1465,1469,1463,1454,1447,1445,1447,1454,1463,1470,1472,1471,1470,1467,1459,1451,1455,1469,1484,1498,1515,1522,1512,1497,1497,1505,1511,1510,1503,1492,1476,1461,1458,1473,1531,1684,1950,2251,2463,2515,2419,2239,2049,1890,1773,1696,1651,1620,1600,1583,1562,1535,1512,1501,1501,1507,1516,1523,1530,1535,1536,1540,1547,1551,1553,1557,1560,1555,1546,1537,1532,1529,1528,1529,1531,1531,1530,1527,1518,1508,1507,1519,1536,1546,1548,1545,1536,1523,1509,1499,1498,1516,1573,1705,1941,2230,2458,2546,2489,2334,2141,1960,1814,1700,1614,1557,1527,1517,1516,1513,1503,1487,1471,1461,1462,1470,1481,1494,1507,1516,1520,1521,1519,1515,1512,1511,1510,1504,1496,1496,1506,1517,1528,1543,1555,1559,1556
],
"Desc-Text": " - Your nadi is collected by exerting less pressure on the sensors.
- The nadi of your previous visit is absent or has very less pressure amplitude values for the comparison.",
"Graph-Min-Max": [
2759, 1197
],
"Pressure-Average": 1782
},
"Pitta": {
"Data": [
1556,1558,1563,1571,1575,1573,1583,1618,1696,1834,1988,2095,2135,2119,2060,1966,1856,1748,1654,1577,1517,1477,1453,1441,1436,1437,1443,1452,1462,1477,1504,1535,1563,1589,1617,1643,1660,1669,1671,1667,1658,1646,1632,1618,1603,1588,1581,1581,1580,1574,1572,1576,1570,1559,1551,1556,1566,1570,1567,1563,1562,1567,1575,1582,1596,1623,1671,1762,1899,2032,2112,2128,2099,2037,1949,1846,1746,1654,1575,1512,1463,1429,1411,1407,1413,1422,1436,1459,1491,1529,1574,1617,1655,1685,1702,1703,1695,1684,1669,1650,1629,1612,1592,1573,1573,1589,1601,1602,1593,1576,1563,1560,1561,1566,1583,1603,1610,1606,1597,1589,1586,1589,1602,1625,1674,1776,1912,2024,2078,2078,2043,1982,1898,1803,1707,1620,1546,1487,1448,1428,1418,1415,1420,1429,1441,1461,1489,1524,1559,1593,1620,1638,1651,1663,1674,1674,1664,1649,1634,1621,1611,1598,1583,1571,1560,1543,1529,1525,1529,1534,1537,1536,1535,1538,1545,1555,1569,1586,1604,1632,1703,1833,1977,2074,2113,2105,2058,1981,1883,1778,1679,1595,1530,1483,1452,1430,1417,1416,1422,1430,1437,1447,1462,1485,1519,1556,1590,1625,1659,1686,1700,1703,1697,1685,1674,1667,1657,1641,1621,1600,1585,1572,1564,1562,1562,1563,1565,1567,1568,1569,1571,1574,1585,1609,1652,1741,1883,2018,2091,2102,2074,2019,1936,1839,1745,1656,1579,1526,1491,1463,1438,1425,1424,1432,1448,1471,1504,1537,1565,1591,1617,1637,1650,1663,1676,1684,1681,1666,1646,1630,1618,1607,1590,1568,1559,1558,1554,1554,1555,1554,1552,1551,1552,1555,1560,1563,1567,1591,1666,1797,1933,2020,2054,2044,1998,1925,1837,1745,1658,1588,1539,1505,1482,1471,1468,1473,1479,1481,1476,1471,1475,1495,1527,1558,1588,1619,1642,1654,1657,1653,1641,1624,1611,1601,1587,1578,1579,1579,1574,1566,1558,1552,1553,1557,1559,1558,1555,1553,1555,1566,1602,1693,1835,1970,2054,2086,2077,2031,1953,1862,1770,1692,1631,1584,1547,1521,1507,1508,1515,1518,1515,1511,1507,1505,1512,1530,1555,1574,1585,1594,1606,1618,1627,1631,1630,1625,1622,1619,1613,1603,1594,1589,1586,1583,1590,1596,1588,1581,1576,1569,1563,1559,1558,1572,1630,1750,1892,2000,2053,2052,2008,1930,1838,1754,1684,1632,1594,1563,1538,1518,1503,1498,1505,1516,1526,1531,1535,1543,1554,1568,1583,1598,1614,1629,1642,1647,1645,1641,1637,1632,1627,1625,1620,1607,1588,1571,1559,1546,1537,1531,1529,1527,1527,1531,1538,1551,1566,1598,1670,1790,1928,2025,2059,2045,1998,1927,1838,1744,1655,1582,1530,1500,1486,1484,1491,1497,1496,1489,1483,1485,1499,1521,1545,1567,1589,1614,1634,1648,1657,1662,1657,1645,1631,1621,1610,1594,1579,1570,1568,1568,1571,1573,1574,1574,1571,1565,1560,1562,1570,1585,1607,1642,1709,1814,1923,1999,2030,2016,1964,1884,1795,1715,1647,1594,1561,1542,1528,1520,1522,1529,1530,1524,1517,1522,1537,1555,1578,1603,1622,1637,1653,1669,1679,1680,1674,1662,1646,1629,1612,1598,1592,1591,1583,1572,1566,1559,1554,1553,1554,1559,1567,1572,1575,1575,1585,1628,1716,1837,1950,2021,2038,2001,1929,1843,1759,1684,1620,1568,1531,1510,1502,1506,1517,1529,1536,1533,1521,1511,1510,1521,1541,1567,1595,1620,1640,1653,1657,1657,1651,1638,1623,1613,1605,1598,1589,1578,1572,1570,1570,1568,1565,1564,1565,1564,1560,1554,1549,1550,1561,1590,1653,1759,1884,1992,2052,2049,1992,1906,1813,1724,1647,1589,1549,1527,1519,1521,1529,1536,1539,1537,1533,1527,1524,1531,1545,1562,1580,1598,1617,1632,1643,1651,1653,1650,1643,1631,1619,1607,1595,1586,1584,1587,1588,1587,1586,1583,1575,1566,1564,1567,1572,1576,1577,1580,1584,1603,1667,1777,1905,2010,2061,2049,1983,1887,1786,1699,1634,1590,1562,1549,1550,1556,1562,1567,1565,1555,1544,1537,1539,1548,1562,1580,1598,1617,1634,1649,1660,1663,1658,1650,1641,1628,1613,1591,1577,1579,1581,1580,1580,1579,1579,1578,1575,1569,1567,1572,1578,1581,1579,1575,1571,1569,1572,1588,1641,1744,1879,1999,2061,2061,2006,1913,1812,1722,1648,1588,1544,1514,1498,1496,1506,1522,1538,1545,1542,1536,1532,1535,1546,1563,1584,1608,1631,1650,1660,1662,1656,1644,1631,1621,1612,1598,1582,1576,1577,1577,1578,1577,1567,1566,1575,1576,1572,1573,1579,1580,1570,1564,1572,1582,1585,1585,1592,1616,1661,1743,1859,1972,2048,2071,2037,1955,1850,1752,1667,1597,1546,1517,1504,1502,1508,1518,1526,1530,1532,1535,1538,1543,1555,1577,1605,1632,1654,1670,1677,1676,1669,1661,1652,1644,1634,1618,1598,1586,1583,1582,1583,1588,1592,1593,1591,1587,1584,1583,1584,1587,1592,1594,1588,1582,1585,1588,1590,1600,1618,1662,1756,1880,1991,2059,2068,2016,1930,1831,1736,1652,1585,1537,1508,1492,1485,1487,1497,1510,1518,1521,1525,1535,1551,1571,1593,1616,1638,1657,1670,1673,1667,1657,1643,1631,1621,1611,1596,1583,1576,1569,1565,1569,1575,1578,1586,1590,1579,1574,1577,1578,1577,1577,1575,1569,1569,1574,1575,1582,1602,1641,1718,1833,1946,2017,2037,2011,1950,1868,1775,1685,1611,1555,1514,1493,1485,1483,1485,1490,1493,1494,1502,1520,1543,1568,1594,1619,1644,1662,1671,1673,1671,1666,1661,1654,1640,1621,1600,1588,1588,1592,1598,1603,1606,1605,1600,1594,1591,1587,1578,1571,1568,1567,1570,1576,1582,1585,1585,1601,1640,1717,1831,1942,2017,2043,2022,1963,1879,1784,1694,1614,1552,1510,1484,1471,1471,1482,1496,1507,1517,1528,1542,1560,1580,1602,1627,1646,1663,1681,1695,1696,1687,1673,1654,1636
],
"Desc-Text": " - Your nadi is collected by exerting less pressure on the sensors.
- The nadi of your previous visit is absent or has very less pressure amplitude values for the comparison.",
"Graph-Min-Max": [
2241, 1350
],
"Pressure-Average": 1578
},
"Kapha": {
"Data": [
1144,1183,1290,1504,1816,2193,2573,2866,3032,3092,3074,2992,2865,2713,2547,2375,2207,2057,1934,1838,1768,1711,1654,1592,1528,1469,1421,1393,1387,1401,1428,1467,1511,1553,1587,1608,1612,1597,1566,1532,1500,1470,1440,1405,1368,1335,1307,1283,1263,1245,1230,1218,1206,1191,1175,1158,1140,1128,1135,1185,1317,1554,1881,2242,2553,2758,2860,2877,2821,2711,2569,2407,2236,2071,1923,1795,1696,1624,1569,1520,1470,1421,1380,1351,1340,1346,1364,1392,1429,1471,1504,1523,1531,1527,1509,1481,1442,1397,1349,1304,1267,1239,1217,1195,1175,1158,1142,1128,1118,1109,1101,1096,1094,1093,1090,1083,1082,1099,1155,1283,1509,1820,2165,2467,2673,2782,2816,2784,2697,2568,2414,2251,2094,1952,1831,1731,1653,1588,1530,1479,1435,1399,1378,1371,1383,1410,1444,1481,1520,1556,1592,1625,1646,1646,1626,1594,1556,1516,1476,1438,1402,1370,1341,1318,1303,1291,1280,1270,1258,1245,1237,1237,1243,1251,1262,1272,1283,1304,1349,1437,1603,1858,2173,2486,2731,2882,2945,2930,2852,2728,2571,2397,2219,2053,1909,1796,1708,1636,1571,1507,1448,1398,1364,1352,1361,1388,1428,1476,1526,1563,1585,1592,1588,1575,1556,1536,1516,1492,1463,1428,1390,1352,1318,1288,1264,1248,1242,1241,1234,1215,1191,1172,1160,1153,1149,1145,1142,1145,1174,1256,1421,1671,1984,2308,2576,2753,2837,2838,2767,2639,2470,2278,2082,1898,1740,1607,1495,1395,1310,1243,1199,1181,1187,1212,1247,1289,1340,1396,1449,1496,1536,1565,1579,1580,1570,1553,1533,1512,1493,1479,1467,1454,1433,1406,1377,1348,1323,1308,1299,1285,1266,1248,1233,1229,1234,1249,1276,1330,1440,1625,1875,2170,2476,2734,2904,2976,2963,2879,2741,2566,2373,2170,1965,1772,1603,1467,1359,1274,1214,1178,1165,1177,1214,1270,1335,1401,1460,1509,1547,1573,1585,1581,1565,1546,1529,1516,1510,1505,1493,1470,1437,1401,1365,1337,1319,1312,1310,1312,1308,1292,1269,1248,1238,1244,1276,1356,1507,1722,1979,2259,2529,2737,2857,2897,2865,2770,2624,2447,2251,2052,1866,1700,1555,1436,1345,1280,1234,1206,1198,1212,1247,1290,1335,1377,1418,1457,1495,1522,1534,1531,1518,1499,1475,1445,1410,1375,1341,1309,1282,1258,1234,1209,1182,1157,1142,1139,1144,1153,1169,1192,1240,1349,1534,1780,2070,2372,2635,2816,2906,2915,2852,2725,2550,2348,2138,1936,1755,1600,1470,1363,1272,1195,1135,1099,1085,1095,1129,1176,1231,1296,1370,1443,1502,1542,1563,1573,1577,1575,1566,1546,1517,1481,1443,1411,1385,1361,1332,1303,1276,1256,1242,1232,1228,1235,1264,1333,1461,1654,1906,2205,2500,2734,2884,2956,2948,2868,2728,2544,2342,2149,1972,1809,1657,1516,1390,1289,1220,1185,1181,1198,1225,1263,1311,1360,1409,1456,1496,1524,1536,1535,1525,1510,1491,1465,1430,1390,1348,1310,1281,1261,1246,1232,1222,1213,1206,1202,1200,1205,1237,1331,1504,1746,2036,2333,2585,2758,2843,2843,2773,2651,2496,2327,2157,1990,1834,1697,1581,1485,1402,1331,1268,1219,1189,1184,1199,1230,1274,1325,1375,1417,1448,1463,1461,1447,1429,1408,1385,1359,1333,1304,1268,1227,1187,1156,1135,1126,1120,1110,1095,1085,1096,1149,1278,1497,1786,2107,2407,2642,2800,2881,2889,2831,2722,2580,2424,2263,2108,1965,1841,1735,1640,1552,1470,1396,1334,1286,1258,1252,1259,1272,1288,1312,1344,1380,1412,1435,1441,1434,1424,1414,1402,1385,1368,1351,1333,1314,1293,1270,1245,1222,1204,1187,1169,1157,1171,1248,1420,1677,1984,2286,2533,2701,2784,2790,2735,2637,2514,2378,2234,2084,1941,1815,1708,1620,1547,1482,1419,1360,1314,1288,1284,1296,1318,1346,1378,1414,1450,1478,1497,1511,1519,1522,1520,1512,1490,1455,1413,1372,1330,1290,1252,1217,1187,1163,1147,1138,1136,1144,1183,1289,1480,1751,2062,2357,2591,2747,2822,2819,2750,2632,2481,2315,2153,2002,1863,1739,1631,1530,1433,1345,1272,1222,1197,1196,1211,1236,1276,1325,1374,1414,1444,1462,1467,1463,1454,1441,1422,1396,1365,1333,1307,1289,1273,1257,1238,1216,1191,1169,1156,1155,1169,1198,1259,1381,1582,1848,2136,2397,2595,2716,2752,2711,2617,2496,2364,2228,2093,1962,1840,1734,1648,1575,1499,1422,1357,1315,1295,1295,1311,1335,1367,1407,1454,1505,1549,1580,1593,1587,1568,1540,1508,1476,1450,1426,1395,1357,1318,1280,1248,1225,1210,1200,1191,1182,1180,1200,1271,1425,1663,1949,2233,2472,2641,2728,2735,2673,2562,2428,2285,2145,2013,1894,1791,1706,1635,1576,1520,1459,1393,1334,1292,1273,1281,1314,1363,1416,1463,1500,1526,1544,1550,1543,1529,1508,1480,1448,1412,1375,1343,1320,1299,1277,1251,1222,1194,1166,1144,1127,1116,1119,1157,1265,1467,1747,2059,2349,2570,2704,2746,2708,2612,2482,2342,2207,2081,1969,1872,1791,1724,1664,1603,1537,1466,1399,1346,1311,1298,1300,1317,1347,1384,1423,1461,1492,1513,1518,1505,1481,1453,1424,1394,1368,1347,1325,1302,1283,1264,1239,1210,1187,1172,1161,1153,1146,1143,1152,1196,1314,1527,1814,2123,2398,2602,2718,2744,2687,2575,2441,2310,2190,2082,1991,1916,1850,1787,1720,1647,1571,1501,1443,1403,1383,1380,1393,1416,1447,1485,1524,1555,1576,1588,1588,1577,1554,1523,1489,1455,1424,1398,1374,1352,1332,1313,1292,1269,1248,1235,1231,1226,1215,1199,1183,1175,1180,1219,1327,1530,1820,2145,2441,2661,2788,2824,2780,2680,2544,2394,2245,2104,1972,1859,1770,1699,1640,1583,1525,1465,1407,1360,1331,1323,1337,1370,1415,1464,1508,1542,1563,1568,1558,1540,1517,1488,1453,1416,1381,1350,1324,1305,1289
],
"Desc-Text": " - Your nadi is collected by exerting less pressure on the sensors.
- The nadi of your previous visit is absent or has very less pressure amplitude values for the comparison.",
"Graph-Min-Max": [
3246, 1038
],
"Pressure-Average": 1547
},
"Desc-Text": "Pressure sensors convert the manual nadi feeling into pressure amplitude values ranging from 0 (lowest palpable) to 10000 (highest palpable) on y-axis.Your nadi at Kapha location (ring finger) is present, but the pulse at Pitta location (middle finger) and Vata location (index finger) are less palpable. Refer to Gati based nadi on next page for understanding your vikruti."
},
"Pulse-Data": {
"Vata": {
"Data": [
-116,-112,-105,-93,-75,-52,-20,19,67,121,180,243,306,368,426,478,522,558,583,598,602,596,581,556,524,487,446,403,359,316,274,235,198,163,132,103,77,55,35,18,4,-8,-18,-27,-35,-42,-48,-54,-59,-63,-66,-67,-68,-69,-68,-68,-67,-67,-66,-66,-66,-65,-64,-62,-59,-56,-52,-49,-45,-43,-41,-41,-41,-42,-44,-46,-48,-50,-52,-54,-55,-56,-57,-58,-59,-60,-61,-64,-67,-70,-74,-78,-82,-85,-88,-91,-93,-95,-95,-96,-95,-93,-91,-89,-85,-82,-79,-76,-74,-73,-73,-73,-74,-76,-78,-80,-83,-85,-86,-87,-87,-87,-86,-84,-82,-79,-74,-69,-63,-56,-49,-42,-35,-30,-25,-21,-18,-16,-14,-13,-13,-14,-15,-17,-20,-23,-25,-27,-28,-28,-28,-26,-24,-23,-22,-22,-24,-27,-30,-35,-40,-46,-51,-57,-62,-67,-72,-77,-81,-84,-87,-88,-89,-89,-89,-88,-87,-84,-82,-79,-76,-73,-71,-69,-68,-69,-71,-75,-79,-84,-90,-96,-102,-108,-114,-120,-125,-130,-134,-137
],
"Desc-Text": "As compared to the healthy reference pulse of your age group, gender and prahar, the nadi at Vata location has high values. It preliminary indicates: Bloating, Constipation, Giddiness, Hyperthinking, Joint stiffness",
"Baseline": [
-218,-217,-215,-212,-208,-203,-196,-189,-179,-168,-154,-138,-118,-95,-67,-35,1,42,86,132,178,223,264,300,330,351,365,372,372,367,358,347,333,319,306,293,282,273,266,262,259,257,256,256,255,255,254,252,250,248,245,241,238,233,229,225,221,216,212,208,205,201,197,192,188,183,178,172,166,159,152,144,136,127,118,108,99,89,80,72,64,56,50,45,40,37,35,34,34,35,38,40,44,48,52,56,59,61,61,61,58,55,49,43,36,29,22,16,9,4,-1,-5,-9,-11,-13,-15,-15,-16,-16,-17,-19,-21,-25,-30,-37,-44,-53,-62,-71,-80,-88,-96,-102,-108,-112,-115,-117,-118,-118,-118,-117,-117,-117,-117,-118,-119,-122,-124,-128,-132,-136,-141,-145,-150,-154,-158,-162,-165,-168,-170,-172,-174,-175,-176,-177,-178,-180,-181,-183,-185,-187,-189,-191,-194,-197,-199,-202,-205,-208,-211,-213,-215,-217,-218,-219,-219,-220,-220,-220,-221,-221,-222,-223,-224,-226,-227,-229,-231,-232,-233
],
"Graph-Min-Max": [
632, -290
]
},
"Pitta": {
"Data": [
-65,-64,-64,-63,-63,-63,-62,-62,-62,-61,-61,-61,-62,-62,-62,-62,-62,-62,-61,-61,-59,-57,-53,-48,-41,-32,-20,-4,16,39,68,100,135,172,211,249,286,319,348,372,391,406,416,422,424,422,417,409,397,382,365,345,323,299,273,247,220,193,168,142,118,94,70,48,26,4,-16,-35,-53,-69,-83,-97,-109,-119,-129,-138,-145,-151,-156,-160,-163,-164,-165,-165,-164,-163,-162,-161,-160,-159,-158,-156,-154,-152,-150,-147,-144,-141,-138,-134,-131,-127,-123,-119,-114,-109,-103,-98,-92,-86,-80,-74,-68,-61,-55,-47,-40,-32,-25,-18,-11,-5,0,5,9,13,17,20,23,25,27,28,30,31,31,32,32,33,33,33,32,31,29,26,24,20,17,14,10,7,5,2,-1,-3,-6,-8,-10,-11,-13,-14,-15,-17,-18,-20,-22,-24,-27,-30,-34,-38,-42,-45,-49,-52,-55,-57,-59,-61,-62,-64,-65,-65,-66,-66,-66,-66,-66,-66,-66,-66,-67,-68,-69,-71,-72,-73,-75,-76,-76,-77
],
"Desc-Text": "As compared to the healthy reference pulse of your age group, gender and prahar, the nadi at Pitta location has similar values. It preliminary indicates: Normal digestion, Normal skin complexion, Normal vision",
"Baseline": [
-197,-196,-193,-188,-179,-167,-152,-131,-105,-74,-39,2,45,91,139,187,234,280,322,360,393,422,446,464,478,487,493,495,494,491,485,478,469,458,445,432,417,401,384,367,350,333,316,299,283,268,253,238,225,212,199,188,177,167,157,149,141,133,126,118,111,104,96,88,80,72,63,53,44,34,25,15,6,-3,-11,-18,-25,-30,-35,-39,-43,-46,-49,-51,-53,-56,-58,-61,-64,-68,-73,-79,-85,-92,-100,-108,-116,-124,-132,-139,-145,-150,-154,-156,-157,-156,-154,-151,-147,-142,-136,-129,-122,-115,-107,-100,-93,-86,-79,-73,-67,-62,-57,-52,-47,-43,-38,-34,-29,-25,-21,-17,-14,-10,-8,-6,-4,-4,-4,-5,-6,-9,-13,-17,-22,-27,-33,-39,-45,-51,-57,-63,-68,-74,-80,-86,-92,-98,-105,-111,-118,-125,-132,-139,-145,-152,-158,-163,-168,-172,-176,-180,-183,-185,-188,-190,-193,-195,-197,-200,-202,-204,-207,-210,-212,-215,-218,-221,-224,-227,-230,-233,-236,-239,-243,-246,-250,-254,-258,-260
],
"Graph-Min-Max": [
625, -290
]
},
"Kapha": {
"Data": [
-444,-443,-440,-435,-429,-420,-408,-392,-371,-345,-314,-276,-232,-182,-127,-66,0,70,145,223,304,387,471,554,635,713,788,858,923,981,1034,1081,1120,1154,1181,1201,1215,1224,1226,1222,1213,1198,1178,1154,1125,1092,1056,1017,976,934,889,843,797,750,702,654,606,558,510,463,416,370,326,283,241,201,162,126,90,57,24,-7,-36,-65,-93,-120,-146,-170,-194,-217,-238,-258,-277,-295,-311,-326,-340,-353,-364,-374,-381,-387,-391,-394,-395,-394,-392,-388,-384,-378,-372,-365,-357,-348,-339,-329,-318,-306,-294,-281,-268,-255,-242,-229,-216,-204,-192,-181,-170,-160,-151,-142,-134,-126,-119,-113,-107,-102,-97,-94,-91,-89,-88,-88,-88,-89,-90,-92,-94,-96,-98,-101,-104,-108,-111,-116,-120,-125,-130,-135,-141,-147,-153,-160,-168,-177,-186,-196,-206,-217,-228,-239,-250,-260,-271,-280,-289,-298,-307,-315,-322,-329,-335,-341,-346,-351,-356,-361,-366,-372,-378,-384,-390,-397,-404,-411,-418,-425,-432,-439,-445,-450,-455,-460,-463,-466,-468,-470,-472,-472
],
"Desc-Text": "As compared to the healthy reference pulse of your age group, gender and prahar, the nadi at Kapha location has high values. It preliminary indicates: Dyspnoea, Excess sleep, Feeling of heaviness, Weak digestion, White discoloration",
"Baseline": [
-205,-203,-200,-194,-185,-174,-160,-144,-124,-102,-77,-50,-22,8,39,70,102,132,162,190,215,239,259,277,292,304,313,319,322,323,322,318,313,307,301,295,289,284,279,275,272,269,267,265,263,262,261,261,260,259,259,258,256,255,254,252,250,248,245,243,240,237,234,230,226,222,218,213,208,202,197,191,185,179,172,165,158,150,143,135,126,118,110,101,93,84,76,68,60,52,44,37,30,24,18,12,8,3,0,-3,-5,-7,-8,-9,-9,-9,-9,-9,-9,-9,-9,-9,-9,-9,-9,-9,-9,-9,-9,-10,-10,-11,-13,-15,-17,-21,-25,-30,-36,-42,-50,-58,-66,-75,-84,-93,-102,-110,-119,-126,-133,-140,-146,-152,-157,-162,-167,-171,-175,-178,-181,-184,-186,-188,-189,-190,-191,-192,-192,-193,-194,-195,-196,-198,-200,-203,-207,-211,-215,-220,-224,-229,-233,-236,-240,-243,-245,-247,-248,-249,-249,-249,-250,-250,-250,-251,-253,-254,-257,-260,-263,-267,-272,-277,-282,-287,-292,-295,-298,-300
],
"Graph-Min-Max": [
1287, -454
]
}
},
"Bala": {
"Value": 100,
"Desc-Text": " - Bala is the force by which nadi exerts the pressure back on the finger. It is related to the strength of disease.
- Usually bala is more in Pitta prakruti, less in Vata prakruti and moderate in Kapha prakruti.
- Observation: Pitta bala with 100 % value was found, which means the Pitta symptoms or vyadhi are more than other two doshas.
- The preliminary indications are :Ibs, Burning in urination, Excess thirst, Piles, Short temper.
- There is no previous visit available for the comparison."
},
"Agni": {
"Value": 70,
"Desc-Text": " - Agni is the digestive fire needed for metabolism, absorbtion of food. Here, jatharagni is computed.
- Observation: Samagni with 70 % value was found. i.e. Agni is balanced.
- The preliminary indications are :Anger, Burning in chest, Burning sensation, Dizziness, Headache.
- There is no previous visit available for the comparison."
},
"Gati-Based-Vikruti": {
"Sarpa-Gati": {
"Vata": 30,
"Pitta": 20,
"Kapha": 10
},
"Manduka-Gati": {
"Vata": 70,
"Pitta": 90,
"Kapha": 80
},
"Hansa-Gati": {
"Vata": 10,
"Pitta": 20,
"Kapha": 10
},
"Desc-Text": " - Gati is the description of nadi based on comparing it to the movements of different animals / birds. It is the way of teaching nadi.
- Typical Vata, Pitta and Kapha gatis are Sarpa, Manduka and Hansa respectively. e.g. When nadi feel is jumping like a frog, it is Pitta and so on.
- Manduka gati is more at Pitta location, the pitta related symptoms are present. Note that pachaka, ranjaka, sadhaka pitta might have provoked. Rakta dhatu dushti preliminarily indicates : Annapachan kaal, Diarrhoea, Fever, Mouth ulcers, Pimples.",
"Gati-Text": "Pitta (Manduka)"
},
"Nadi-Guna": {
"Laghu-Guru": {
"Value": "olr90",
"Desc-Text": "
- Laghu guna is light in feel, fast moving and which indicates no any doshavruddhi (increased vitiated dosha) or no presence of aam (toxins). It is Vata and Pitta guna.
- Opposite to Laghu is Guru guna which is heavy, slow and dull which indicates doshavruddhi (increased vitiated dosha) or presence of aam (toxins). It is property of kapha dosha.
- Low Laghu guna preliminarily indicates indigestion, laziness, loss of appetite, joint stiffness and kapha disorders like :Loss of enthusiasm, Diabetes, Excess sleep, Obesity, Ajirna.
- There is no previous visit available for the comparis...",
"Laghu": 10,
"Guru": 90
},
"Kathina-Mrudu": {
"Value": "olr100",
"Desc-Text": "Kathina guna is the hard touch of nadi. It is preliminary found in the vitiation of rakta / mansa / asthi.
- Opposite to Kathina is Mrudu guna, which is soft in touch. i.e. When we press mrudu nadi, it easily gets pressed. Mrudu guna is typically found in healthy and young person.
- Low Kathina guna preliminarily indicates :Amoebiasis, Bloating, Fever, Dosha Dhatu Dushti, Ajirna.
- There is no previous visit available for the comparison.",
"Kathina": 0,
"Mrudu": 100
},
"Sthula-Sukshma": {
"Value": "olr10",
"Desc-Text": "
- Sthula nadi is thick in the feeling. This is because the nadi is filled with aam (toxins), rakta, mansa.
- Opposite to Sthula, Sukshma nadi is thin and not easily found. It is usually empty and with less bala. It is preliminarily found in vitiation of asthi / dhatu.
- High Sthula guna preliminarily indicates :Anger, Fever, Hyperacidity, Kidney disorders, Mansa vruddhi.
- There is no previous visit available for the comparison.",
"Sthula": 90,
"Sukshma": 10
},
"Tikshna-Manda": {
"Value": "olr20",
"Desc-Text": " - Tikshnata indicates sharpness, has pricking penetrating action. Typically, it is the guna of Pitta.
- Opposite to Tikshna is Manda guna, which decreases the fire. Typical manda nadi has low energy.
- High tikshnata (low manda guna) is usually hyper activity of pitta or imbalance in pachak pitta or sadhak pitta dushti. It preliminarily indicates:Burning sensation, Blood disorders, Lack of sleep, Migraine, Stress.
- There is no previous visit available for the comparison.",
"Tikshna": 80,
"Manda": 20
},
"Snigdha-Ruksha": {
"Value": "olr20",
"Desc-Text": "
- Snigdha guna forms the oiliness, softness of dosha, dhatu and mala.
- Opposite to Snigdha is Ruksha guna, which is dryness and property of Vata dosha.
- High Snigdhata is soft in touch and preliminary indicates kapha predominant disorders like : Asthma, Indigestion, Laziness, Majja vruddhi, Obesity.
- There is no previous visit available for the comparison.",
"Snigdha": 80,
"Ruksha": 20
}
},
"PRV-Based-Parameters-Text": "The variability in the consecutive intervals in the nadi beats is pulse rate variability (PRV). It is the manifestation of heart rate variability. It indicates imbalances between sympathetic and parasympathetic nervous systems. The sympathetic nervous system prepares the body for intense physical activity and is often referred to as the fight-or-flight response. The parasympathetic nervous system has almost the exact opposite effect and relaxes the body and inhibits or slows many high energy functions.
- PRV is affected by many factors including age, physical conditions, but is most affected by extreme activities, sleep-wake cycle, meals, mental stress and physical stress.
- Typical stress condition happens when the Sympathetic nervous system is active / pulse rate is high / PRV is low.
- Typical relaxed condition happens when the Parasympathetic nervous system is active / pulse rate is low / PRV is high.
- Thoughts or emotions are typically distinguished by changes in rhythm, bala and tikshnata parameters of nadi.",
"Thoughts": {
"Value": 60,
"Desc-Text": "Thoughts are the reflection of digestion and metabolism, nourishment of rasa dhatu and manas bhav. Today observed high but positive thoughts which preliminary indicates, utsah/ motivational attitude, prerana/inpirational actions, but also sometimes chanchalat/restlessness, anidra/sleep issues."
},
"Prone-To-Stress": {
"Value": 60,
"Desc-Text": "Stress is called as sahas in Ayurveda which is excess of exertional activities beyond capabilities of body, mind and intelligance. Today observed moderate stress on body and mind which preliminarily indicates mana samtolata/balaced mind, uttam karya kshamata/proper work life balance and sharir bala/physical strength."
},
"Summary-Text": " - The nadi was recorded in the day time Vata prahar. It is a good time to work on a math problem, to write, to compose music or anything that requires brain power and creativity. Typically, There will be moderate guruta, sukshmata, rukshata.
- Based on your height of 172 cm and weight of 83 kg, your BMI is 28. You are in overweight category.
- For your age, regular rhythm means rugna bala is moderate with good heart activity.",
"Summary2-Text": "Burning in eyes, Discoloration of eyes, Photophobia, Ibs, Acne",
"Summary2": ",SingleLMH_VataHighSympt4,SingleLMH_PittaSimilarSympt4,SingleLMH_KaphaHighSympt4,BalaPittaHighSympt4,AgniTikshnaSympt4,GatiManPSympt4,LaghulowestSympt4,kathinlowestSympt4,sthoolhighestSympt4,TikshnaHighestSympt4,snigdhhighestSympt4",
"3D-Graph": "TBD",
"Individual-Location": {
"Agni": {
"Vata": 40,
"Pitta": 80,
"Kapha": 60
},
"Bala": {
"Vata": 10,
"Pitta": 40,
"Kapha": 100
},
"Laghuta": {
"Vata": 70,
"Pitta": 90,
"Kapha": 100
},
"Kathinata": {
"Vata": 100,
"Pitta": 100,
"Kapha": 90
},
"Sthulata": {
"Vata": 30,
"Pitta": 30,
"Kapha": 0
},
"Tikshnata": {
"Vata": 0,
"Pitta": 10,
"Kapha": 30
},
"Snigdhata": {
"Vata": 80,
"Pitta": 60,
"Kapha": 30
}
},
"Diet": {
"Grain": {
"Do": "Cereals, Jowar, Sathi rice, Wheat bran, Wheat",
"Dont": "Bajara, Corn, Muesli, Mustard, New grains",
"Label": "Grain"
},
"Legume": {
"Do": "Green gram dal, Red gram, Black beans, Kidney beans, Lima beans",
"Dont": "Black gram dal, Horse gram, Tur dal",
"Label": "Legume"
},
"Veg": {
"Do": "Broccoli, Bottle gourd, Onion, Pumpkin, Ridge gourd",
"Dont": "Brinjal, Capsicum, Cluster beans, Green chillies, Mustard greens",
"Label": "Veg"
},
"Spices": {
"Do": "Bay leaf, Black pepper, Cinnamon, Parsley, Peppermint",
"Dont": "Bell pepper, Cumin seeds, Garlic, Paprika, Thyme",
"Label": "Spices"
},
"Leafy veg": {
"Do": "Asparagus, Coriander, Lettuce, Mint, Spinach",
"Dont": "Carrot leaves, Fenugreek, Mustard leaves, Sesame leaves, Taro leaves",
"Label": "Leafy veg"
},
"Oil": {
"Do": "Olives, Coconut, Flax seeds, Primrose, Soybeans",
"Dont": "Apricots, Almonds, Corn, Mustard, Sesame",
"Label": "Oil"
},
"Fruits": {
"Do": "Apple sauce, Berries (sweet), Figs, Jamun, Pomegranate",
"Dont": "Cherries (sour), Karonda, Oranges (sour), Mango, Most sour fruit",
"Label": "Fruits"
},
"Nuts and Dry fruits": {
"Do": "Amla jam, Black raisins, Figs, Soaked almonds, Wet dates",
"Dont": "Hazel nut, Peanuts, Walnut, Cashew, Roasted and salted dry fruits",
"Label": "Nuts and Dry fruits"
},
"Milk product": {
"Do": "Butter (unsalted), Cottage cheese, Ghee, Ice cream, Buffalo milks ghee",
"Dont": "Curd, Hard cheese, Salted butter, Sour cream, Yogurt",
"Label": "Milk product"
},
"Non-veg": {
"Do": "Chicken, Egg white, River water fish",
"Dont": "Egg yolk, Lamb, Mutton, Sea fish, Sea foods",
"Label": "Non-veg"
},
"Condiments": {
"Do": "Chutney mango (sweet), Coriander leaves, Hijiki, Sprouts, Tamari",
"Dont": "Chocolate, Gomasio, Lemons, Mayonnaise, Pickles",
"Label": "Condiments"
}
},
"Lifestyle": {
"Yoga": {
"Do": "Dhanurasana, Moderate yoga, Padahastasana, Paschimottanasana, Sitting pose",
"Dont": "Bikram yoga, Power yoga, Shirsasana, Simhasana, Utkatasana",
"Label": "Yoga"
},
"Fitness": {
"Do": "Hiking, Mountain biking, Soccer, Sports, Surfing",
"Dont": "",
"Label": "Fitness"
},
"Recipe": {
"Do": "Masala Dosa, Mullangi Kobbari Kura, Chana Curry, Pappu Biyyam, Karuvepaku Kodi Vepudu",
"Dont": "Turnip Kobbari Koora, Brussels Sprouts Kura, Naatu Kodi Gudla Pulusu, Karam Boondi, Peethala Fry",
"Label": "Recipe",
"Display-Order": 1,
"English-Label": "recipe"
}
},
"Dinacharya": "dinacharyaContent",
"Dinacharya-Text": "दिनचर्या
Balanced prakruti | Good digestion | Maintain health | Gain peace

Start your day early before sunrise with a feeling of freshness and lightness.ब्राह मुहूर्तम् is mentioned as 96 minutes before sunrise. 
Wash your face and clean the teeth (दंत धावनम्) with soft toothbrush or bitter astringent herbs like नीम. Massage the gums with a herbal powder mixed with honey. Clean the tongue by gentle Scrubbing (जिव्हा निर्लेखन). You may repeat this after every food intake. 
Gargle with oils, decoctions, honey, milk, water etc. It gives strength to the jaws and teeth. Note that गंडुशम् means holding a large quantity of fluid into mouth and कवलम् means holding pasty solutions in mouth for soothing. 
Apply nasal drops prepared using oils. This inhalation (नस्यम्) helps to lubricate the nose, clear the sinuses, give clear vision & strength to sense organs. 
Perform bowel cleaning / evacuation whenever the urge comes naturally. Do not inhibit or stimulate these urges. 
Apply oil all over the body (अभ्यंगम्) especially on head, ear and feet and gently massage. Massaging process is very beneficial to skin, helps to reduce stress, fatigue, makes body smooth & strong and prevents the signs of aging. It is advisable to use sesame oil or coconut oil. 
Any type of exercise should be practiced according to your capacity and body constitution. Yoga can be performed along with सूर्यनमस्कार. This improves flexibility of the body and improves the mental capacity, brings about lightness, stability and stimulates the digestive fire. 
Take bath with luke warm water, wash the head with normal water only. Before bathing, massaging with herbal powder opposite to the direction of hair growth is recommended. Bathing is purifying refreshes body and mind. It removes sweating, fatigue & dirt and increases appetite & ojas. 
Meditation and प्राणायाम in the morning are keys to the healthy body & mind. Meditation improves your ability to focus. It has a calming effect on the mind. It releases stress and gives strength to the mind. Chanting “ॐ” will clear out your thoughts and will help to connect with an inner sole. Meditation will bring peace and harmony. 
Worshiping and offerings to lord (ईश्वर पूजा) increases gratitude. 
Most importantly, throughout the day, maintain a good habit of eating satvik food with षडरस on time. Include fresh fruits and vegetables. Eat with full attention towards food. Avoid eating in hurry or while watching TV, computer or under stress, grief. Avoid overeating or fasting for a long time. Avoid going to bed immediately after dinner. 
Select your job respectfully and carry out to the best of abilities; to benefit not only self but the whole society. Habit of kindness for benefits of nation should always be part of the daily deeds. 
Power nap of 10 -15 minutes is useful in the afternoon. Sleeping on the left side is said to be most digestive. 
Daily sleep of 6 to 8 hours is essential, so decide the sleeping time depending upon your wake up time. Avoid having a full meal just before retiring to bed. Sleeping on the right side is the most relaxing.
",
"Dinacharya-Text-V3": "दिनचर्याBalanced prakruti | Good digestion | Maintain health | Gain peace

Start your day early before sunrise with a feeling of freshness and lightness.
ब्राह मुहूर्तम् is mentioned as 96 minutes before sunrise. 
Wash your face and clean the teeth (दंत धावनम्) with soft toothbrush or bitter astringent herbs like नीम. Massage the gums with a herbal powder mixed with honey. Clean the tongue by gentle Scrubbing (जिव्हा निर्लेखन). You may repeat this after every food intake. 
Gargle with oils, decoctions, honey, milk, water etc. It gives strength to the jaws and teeth. Note that गंडुशम् means holding a large quantity of fluid into mouth and कवलम् means holding pasty solutions in mouth for soothing. 
Apply nasal drops prepared using oils. This inhalation (नस्यम्) helps to lubricate the nose, clear the sinuses, give clear vision & strength to sense organs. 
Perform bowel cleaning / evacuation whenever the urge comes naturally. Do not inhibit or stimulate these urges. 
Apply oil all over the body (अभ्यंगम्) especially on head, ear and feet and gently massage. Massaging process is very beneficial to skin, helps to reduce stress, fatigue, makes body smooth & strong and prevents the signs of aging. It is advisable to use sesame oil or coconut oil. 
Any type of exercise should be practiced according to your capacity and body constitution. Yoga can be performed along with सूर्यनमस्कार. This improves flexibility of the body and improves the mental capacity, brings about lightness, stability and stimulates the digestive fire. 
Take bath with luke warm water, wash the head with normal water only. Before bathing, massaging with herbal powder opposite to the direction of hair growth is recommended. Bathing is purifying refreshes body and mind. It removes sweating, fatigue & dirt and increases appetite & ojas. 
Meditation and प्राणायाम in the morning are keys to the healthy body & mind. Meditation improves your ability to focus. It has a calming effect on the mind. It releases stress and gives strength to the mind. Chanting “ॐ” will clear out your thoughts and will help to connect with an inner sole. Meditation will bring peace and harmony. 
Worshiping and offerings to lord (ईश्वर पूजा) increases gratitude. 
Most importantly, throughout the day, maintain a good habit of eating satvik food with षडरस on time. Include fresh fruits and vegetables. Eat with full attention towards food. Avoid eating in hurry or while watching TV, computer or under stress, grief. Avoid overeating or fasting for a long time. Avoid going to bed immediately after dinner. 
Select your job respectfully and carry out to the best of abilities; to benefit not only self but the whole society. Habit of kindness for benefits of nation should always be part of the daily deeds. 
Power nap of 10 -15 minutes is useful in the afternoon. Sleeping on the left side is said to be most digestive. 
Daily sleep of 6 to 8 hours is essential, so decide the sleeping time depending upon your wake up time. Avoid having a full meal just before retiring to bed. Sleeping on the right side is the most relaxing.
",
"Rutucharya": "rutucharyaContent",
"Rutucharya-Text": "Rutucharya : Grishma
According to the Ayurveda and as Kaal changes, Grishma Rutu is going on. It spans from 19 April 2026 to 21 June 2026. The climate trends in this period are :

Environment is prevalent with intense heat and unhealthy wind. The river-bodies are dried and the plants appear lifeless. Deposition of Vata Dosha occurs, but the vitiated Kapha Dosha is pacified during this season. Typical properties are :
- Sharira Bala : Less
- Jaatharagni : Weak
Recommended food :
- Sweet, Sour, Salty foods are to be consumed.
- Rice, lentil, etc, are to be taken.
- Drinking plenty of water and other liquids, such as cold water in clay pot, sugar cane juice, meat soups, mango juice, coconut water is to be practiced.
- Water cooled with Ushir(cus cus grass) gives soothening effect.
- At bedtime drink milk.
- Mantha prepared of dried grapes, dates and figs is advisable.
- It is very soothing, has a cooling effect and is nourishing. It also relaxes and cools the system.
- Sharabat made of following is suggested.
- Ananta (Hemidesmus indicus), Kamala (Lotus), Gulaba (rose), Amra (Mango), Draksha (Grapes), Chandana (Sandal), Ushira, Jambira (Lemon)
Prohibited food :
- Pungent, bitter and astrigent food should be avoided.
- Avoid Urad(black gram), Mustard and Curd.
Recommended actions :
- Wearing light dresses and sleeping at day time are helpful.
- During night one can enjoy the cooled moon rays with breeze.
- Enjoy in cold water nature zones.
- Stay indoors as far as possible during afternoon.
- Take baths with cold water.
Prohibited actions:
- Avoid excessive exercise & Sex.
- Avoid exposure to sun.
",
"Prakruti": {
"Vata": 60,
"Pitta": 10,
"Kapha": 30,
"Prakruti-Text": "Vata Kapha",
"Prakruti-Text-Desc": "Vata and Kapha are similar considering their cold property. You are restless but Kapha balances the situation with calm and patience. You exhibit mix properties of both Vata (dry skin, fast walk, motivated, anxious, creative, artist, love sweets) and Kapha (heavy, chubby, slow, calm, methodical, deep voice, love junk food)."
},
"Vikruti-Text": "Pitta",
"Vikruti-Text-New": "Pitta",
"Disclaimer": "disclaimerContent",
"Disclaimer-Text": "DISCLAIMER- Recommendations and information provided on this report are not intended as a substitute for medical advice offered by a physician.
- Please do not self-diagnose. Please consult a physician or a healthcare specialist.
- The analysis on the report is subject to the accuracy of the patients medical information and correct usage of the device for capturing the Nadi patterns.
- All reports have their limitations and need correlation with other related tests and clinical signs / symptoms. Kindly interpret accordingly. Practitioners to rely on their own experience and knowledge of the patient for complete diagnosis.
NOTES
",
"Prakruti-Not-Taken-Desc": "Prakruti not captured for this assessment",
"Is-Questionairebased-Prakruti": false
},
"Patient-Info": {
"name": "(NT_CLIENT_External)",
"patient-code": "NT_CLIENT_External",
"age": "35 Years",
"gender": "Male",
"Current-Report-Date": "06/05/2026",
"Current-Report-Time": "05:13 PM",
"DateOfBirth": "1990-06-26"
},
"Doctor-Info": {
"name": "Dr. Nadi Tarangini",
"email": "sushil.kawade@atreyainnovations.com",
"clinic-name": "Jhgfd",
"address-line-1": "Njbhvgf",
"street": null,
"landmark": "sushil.kawade@atreyainnovations.com",
"city": "Hjbnm",
"state": "Andhra Pradesh",
"country": "India",
"pincode": "898777",
"clinic-phone-no": "+91 0009878787",
"Doctor-Mobile-No": "+49 0092020302",
"salutation": "Dr."
}
}
}{
"status": false,
"message": "Unauthorized",
"status_code": "NT_0000"
}{
"status": false,
"status_code": "NT_2503",
"message": "Report not found"
}Get Swasthya Darshika Analysis Data
https://api.ashoka.world/nt-capture/report/swasthya-darshika/{visit_id}GET /nt-capture/report/swasthya-darshika/{visit_id}
curl -H "user-id: YOUR_ID" \
     -H "auth-token: YOUR_TOKEN" \
https://api.ashoka.world/nt-capture/report/swasthya-darshika/{visit_id}import requests
headers = {
"user-id": "YOUR_ID",
"auth-token": "YOUR_TOKEN"
}
response = requests.get(
"https://api.ashoka.world/nt-capture/report/swasthya-darshika/{visit_id}",
headers=headers
)const axios = require('axios');
axios.get(
'https://api.ashoka.world/nt-capture/report/swasthya-darshika/' + visitId,
{
headers: {
'user-id': 'YOUR_ID',
'auth-token': 'YOUR_TOKEN'
}
}
);$response = Http::withHeaders([
'user-id' => 'YOUR_ID',
'auth-token' => 'YOUR_TOKEN'
])->get('https://api.ashoka.world/nt-capture/report/swasthya-darshika/' . $visit_id);HttpRequest request = HttpRequest.newBuilder()
.uri(URI.create("https://api.ashoka.world/nt-capture/report/swasthya-darshika/" + visitId))
.header("user-id", "YOUR_ID")
.header("auth-token", "YOUR_TOKEN")
.GET()
.build();url := "https://api.ashoka.world/nt-capture/report/swasthya-darshika/" + visitId
req, _ := http.NewRequest("GET", url, nil)
req.Header.Add("user-id", "YOUR_ID")
req.Header.Add("auth-token", "YOUR_TOKEN")uri = URI("https://api.ashoka.world/nt-capture/report/swasthya-darshika/#{visit_id}")
request = Net::HTTP::Get.new(uri)
request['user-id'] = 'YOUR_ID'
request['auth-token'] = 'YOUR_TOKEN'var client = new HttpClient();
client.DefaultRequestHeaders.Add("user-id", "YOUR_ID");
client.DefaultRequestHeaders.Add("auth-token", "YOUR_TOKEN");
var response = await client.GetAsync(
$"https://api.ashoka.world/nt-capture/report/swasthya-darshika/{visitId}"
);import 'package:http/http.dart' as http;
final response = await http.get(
Uri.parse(
'https://api.ashoka.world/nt-capture/report/swasthya-darshika/$visitId'
),
headers: {
'user-id': 'YOUR_ID',
'auth-token': 'YOUR_TOKEN'
}
);val client = OkHttpClient()
val request = Request.Builder()
.url("https://api.ashoka.world/nt-capture/report/swasthya-darshika/$visitId")
.addHeader("user-id", "YOUR_ID")
.addHeader("auth-token", "YOUR_TOKEN")
.build()
val response = client.newCall(request).execute()let url = URL(
string: "https://api.ashoka.world/nt-capture/report/swasthya-darshika/\(visitId)"
)!
var request = URLRequest(url: url)
request.httpMethod = "GET"
request.setValue("YOUR_ID", forHTTPHeaderField: "user-id")
request.setValue("YOUR_TOKEN", forHTTPHeaderField: "auth-token")
URLSession.shared.dataTask(with: request).resume(){
"status": true,
"status_code": "NT_2501",
"message": "Success",
"data": {
"Report-Data": {
"Rate_Remark": "Bad",
"Rate_Ideal": "70-90 bpm",
"Rate_Detailed": "Your pulse rate of 111 bpm is significantly higher than the ideal range of 70-90 bpm for your Prakruti, indicating tachycardia.",
"Rhythm_Detailed": "Your pulse rhythm is regular, which is a positive sign despite the elevated rate. This suggests the heart is beating consistently, but too fast.",
"Vikriti": {
"V_Symptoms": "With a Pitta Vikruti, you may experience symptoms like inflammation, heat sensations, redness, and potentially increased acidity or heartburn.",
"V_Mental": "A Pitta imbalance can lead to irritability, impatience, and a tendency towards anger or sharp communication when stressed.",
"V_Energy": "Your energy levels might be high and intense, but prone to burnout if not managed, characteristic of a Pitta imbalance.",
"V_Personality": "You may exhibit traits of being ambitious, driven, and a natural leader, but can also be critical or competitive.",
"V_Digestive": "Digestive issues related to Pitta can include acidity, burning sensations, and a strong appetite that is difficult to satisfy.",
"V_Environmental": "You might be sensitive to heat, sun exposure, and find yourself uncomfortable in overly warm environments.",
"V_Lifestyle": "Your lifestyle may lean towards being highly productive and goal-oriented, but can also involve pushing yourself too hard.",
"V_Physical": "Physically, a Pitta constitution often presents with a medium build, good muscle tone, and potentially fair skin that flushes easily."
},
"V_Detailed": "Your current Pitta Vikruti, combined with an overweight BMI and tachycardia, suggests a state of internal heat and potential inflammation. The high pulse indicates your cardiovascular system is under strain, possibly exacerbated by stress and hyperthinking, despite your high immunity and hydration.",
"Agni": "Medium, Your digestion is currently moderate, as indicated by a medium toxin level and medium digestion status, suggesting it can handle regular meals but may be sensitive to irregularities.",
"Ama": "Low, Your toxin level is low, indicating minimal accumulation of metabolic waste products in your system.",
"Ojas": "High, Your high immunity reflects a robust and well-functioning immune system, indicating good vitality and resilience.",
"Summary1": "Your health shows signs of elevated heart rate (tachycardia) and being overweight. While your immunity and hydration are strong, your Pitta imbalance and medium digestion warrant attention to manage internal heat and prevent future complications.",
"Summary2": "Your health system is like a computer with a fast processor (high immunity, hydration) but an overheating fan (tachycardia, Pitta imbalance) and a slightly bogged-down operating system (medium digestion). We need to cool the system and optimize its performance.",
"key_Hydration": "Your high hydration level is excellent for supporting bodily functions and flushing toxins.",
"key_hyperthinking": "Your medium hyperthinking suggests a busy mind that could benefit from calming practices.",
"key_Stress": "Your medium stress level indicates a need for stress management techniques to prevent escalation.",
"Current": [
"Chest pain, Your elevated pulse rate (tachycardia) is a direct indicator of cardiovascular strain, making chest pain a relevant current concern",
"Sleep issues, The combination of medium stress, medium hyperthinking, and a Pitta imbalance can disrupt sleep patterns, leading to sleep issues"
],
"Future": [
"Diabetes, Your overweight BMI (28.06) combined with a Pitta imbalance increases your risk for developing insulin resistance and future diabetes",
"Thyroid disorder, The elevated pulse rate and potential stress/hyperthinking associated with your Pitta imbalance can sometimes be linked to thyroid dysfunction"
],
"Strong": [
"Kidney, Your high hydration level actively supports the function of this organ",
"Skin, Your high hydration level actively supports the function of this organ",
"Liver, Supported by your stable/moderate digestion and low toxin levels, this organ maintains adequate function"
],
"Weak": [
"Heart, Your pulse rate of 111 bpm indicates significant strain on the heart, making it a weak organ",
"Pancreas, Your overweight BMI and Pitta imbalance place increased demand on the pancreas to regulate blood sugar, indicating a potential weakness",
"Adrenal Glands, The combination of medium stress and medium hyperthinking can put a strain on the adrenal glands over time"
],
"Panchakarma": [
"Virechana, To help pacify your Pitta imbalance and reduce excess heat and potential inflammation",
"Shirodhara, To calm your agitated mind, reduce hyperthinking, and alleviate stress",
"Abhyanga, To ground your Vata constitution, nourish your tissues, and help manage stress"
],
"Aroma": [
"Sandalwood, Its cooling and calming properties are ideal for pacifying your Pitta imbalance and reducing internal heat",
"Chamomile, This aroma is excellent for reducing stress and promoting relaxation, addressing your medium stress levels",
"Lavender, Known for its calming effects, it can help manage your medium hyperthinking and promote better sleep"
],
"Yoga": [
"Paschimottanasana, This pose helps to calm the nervous system and can alleviate stress and hyperthinking",
"Setu Bandhasana, This gentle backbend can help to open the chest and calm the mind, beneficial for your elevated pulse",
"Balasana, A resting pose that helps to calm the mind and reduce stress, supporting your medium stress levels",
"Vrksasana, Improves balance and focus, which can help counter the effects of hyperthinking",
"Marjaryasana-Bitilasana, This gentle flow helps to mobilize the spine and calm the mind, beneficial for stress reduction",
"Anjaneyasana, Opens the chest and hips, promoting relaxation and reducing tension associated with stress"
],
"Exercise": [
"Walking, A gentle cardiovascular exercise that supports your heart health without over-exerting your system.",
"Plank, Builds core strength, which is beneficial for overall stability and can support your overweight BMI.",
"Hamstring Stretch, Improves flexibility, which can be beneficial given your medium flexibility status.",
"Hip Opener Stretch, Helps to release tension in the hips, often associated with stress and sedentary habits.",
"Squats, A compound exercise that builds lower body strength and can aid in weight management.",
"Swimming, A low-impact cardiovascular exercise that is excellent for heart health and managing weight."
],
"Ayurvedic_Supplements": [
"Ashwagandha Capsules, To help manage your medium stress and hyperthinking levels and support overall resilience.",
"Amla Vitamin-C Capsules, Supports your high immunity and provides antioxidant benefits, aligning with your Pitta imbalance."
],
"Health_Supplements": [
"Magnesium, Can help to calm the nervous system, reduce stress, and support cardiovascular health.",
"Coenzyme Q10, Supports heart health and energy production, beneficial given your tachycardia and overweight status."
],
"Ayurvedic_Herbs": [
"Shatavari Root, Known for its cooling properties, it helps to pacify Pitta and support overall vitality.",
"Brahmi Leaves, Excellent for calming the mind, reducing hyperthinking, and improving cognitive function."
],
"Ayurvedic_Medicines": [
"Arogyavardhini Vati, A broad-spectrum medicine that helps balance Pitta, manage weight, and support liver function.",
"Arjunarishta, Specifically indicated for heart health, it helps to regulate heart rate and strengthen the cardiovascular system."
],
"Recommendations": {
"place_name": "Pune, India",
"Dos": [
"Ghee, 1 teaspoon, lubricates the intestines and aids digestion",
"Basmati Rice, 1 bowl, easy to digest and grounding for Vata",
"Moong Dal (Split Mung Bean), 1 bowl, light and easy to digest, balancing for Pitta",
"Cucumber, 1/2 cup, cooling and hydrating, beneficial for Pitta",
"Sweet Lime (Mosambi), 1 fruit, cooling and sweet, pacifies Pitta",
"Coconut Water, 1 glass, hydrating and cooling, excellent for Pitta"
],
"Donts": [
"Spicy Curries, difficult to digest and increases Pitta",
"Fried Foods, heavy and difficult to digest, aggravates Pitta",
"Fermented Foods, can increase Pitta and cause acidity",
"Excessive Salt, can increase Pitta and lead to water retention",
"Sour Fruits, increases Pitta and can cause heartburn"
],
"Dos_nonveg": [
"Chicken Broth, 1 bowl, nourishing and easy to digest",
"Fish (lightly cooked), 1 portion, good source of protein and omega-3s"
],
"Donts_nonveg": [
"Red Meat, heavy and difficult to digest, increases Pitta",
"Shellfish, can be heating and difficult to digest for Pitta"
]
},
"M_Morning": "Ahir Bhairav, This morning raga is known for its calming and grounding qualities, perfect for starting your day with a balanced mind.",
"M_Afternoon": "Shudh Sarang, A midday raga that is both uplifting and soothing, helping to manage energy levels and reduce mental fatigue.",
"M_Evening": "Darbari Kanada, This evening raga is deeply meditative and can help to calm the mind, reduce stress, and prepare for restful sleep.",
"Focus": [
"Nourish: Focus on cooling, easily digestible foods to pacify Pitta and support digestion.",
"Lifestyle: Incorporate stress-reducing activities and mindful practices to manage hyperthinking and pulse rate.",
"Medicine: Utilize Ayurvedic herbs and medicines to address heart health and Pitta imbalance."
],
"Notes": "Continue monitoring your pulse rate and stress levels. Consistency in diet and lifestyle is key to managing your Pitta imbalance.",
"Detailed_Explanations": {
"Toxin_Detailed": "Your low toxin level indicates efficient metabolic processes and minimal waste accumulation, supporting your overall vitality.",
"Immunity_Detailed": "Your high immunity signifies a robust defense system, capable of effectively warding off infections and maintaining health.",
"Digestion_Detailed": "Your medium digestion suggests a balanced but potentially sensitive digestive fire, requiring mindful eating habits to prevent discomfort.",
"Hyper_Detailed": "Your medium hyperthinking indicates a busy mind that can benefit from techniques to promote focus and mental calm.",
"Stress_Detailed": "Your medium stress level suggests a need for proactive stress management to prevent escalation and maintain well-being.",
"Hydration_Detailed": "Your high hydration level is optimal, ensuring proper bodily functions, toxin elimination, and cellular health.",
"Flexibility_Detailed": "Your medium flexibility indicates room for improvement in joint mobility and range of motion, which can be addressed through targeted exercises."
},
"Numbers": {
"Toxins": 27,
"Immunity": 78,
"Digestion": 70,
"Hyperthinking": 57,
"Stress": 40,
"Hydration": 79,
"Flexibility": 43,
"Vikriti_loc": 366
},
"question": {
"Age": 35,
"Gender": "Male",
"Height": 172,
"Weight": 83,
"Date": "06 May 2026",
"Time": "17:45",
"Place": "",
"Prakruti": "Vata kapha",
"Vikruti": "Pitta",
"Pulse rate": 111,
"Pulse rhythm": "Regular",
"Toxins": "Low",
"Immunity": "High",
"Digestion": "Medium",
"Hyperthinking": "Medium",
"Stress": "Medium",
"Hydration": "High",
"Flexibility": "Medium",
"Analogy": [
"Nature objects",
"Computer parts",
"Banking"
],
"BMI": 28.06
},
"Prakruti": {
"Vata": 60,
"Pitta": 10,
"Kapha": 30,
"Prakruti-Text": "Vata Kapha",
"Prakruti-Text-Desc": "Vata and Kapha are similar considering their cold property. You are restless but Kapha balances the situation with calm and patience. You exhibit mix properties of both Vata (dry skin, fast walk, motivated, anxious, creative, artist, love sweets) and Kapha (heavy, chubby, slow, calm, methodical, deep voice, love junk food)."
},
"Vikruti-Text": "Pitta"
},
"Patient-Info": {
"name": "(NT_CLIENT_External)",
"patient-code": "NT_CLIENT_External",
"age": "35 Years",
"gender": "Male",
"Current-Report-Date": "06/05/2026",
"Current-Report-Time": "05:13 PM",
"DateOfBirth": "1990-06-26"
},
"Doctor-Info": {
"name": "Dr. Nadi Tarangini",
"email": "sushil.kawade@atreyainnovations.com",
"clinic-name": "Jhgfd",
"address-line-1": "Njbhvgf",
"street": null,
"landmark": "sushil.kawade@atreyainnovations.com",
"city": "Hjbnm",
"state": "Andhra Pradesh",
"country": "India",
"pincode": "898777",
"clinic-phone-no": "+91 0009878787",
"Doctor-Mobile-No": "+49 0092020302",
"salutation": "Dr."
}
}
}{
"status": false,
"message": "Unauthorized",
"status_code": "NT_0000"
}{
"status": false,
"status_code": "NT_2503",
"message": "Report not found"
}Get Report PDF
https://uploads.ashoka.world/reports/pdf?visit_id={visit_id}&report_name={report_name}GET https://uploads.ashoka.world/reports/pdf?visit_id={visit_id}&report_name={report_name}
Use report_name as NADI_GUNA or SWASTHYA_DARSHIKA.
curl -H "user-id: YOUR_ID" \
     -H "auth-token: YOUR_TOKEN" \
"https://uploads.ashoka.world/reports/pdf?visit_id={visit_id}&report_name={report_name}"import requests
headers = {
"user-id": "YOUR_ID",
"auth-token": "YOUR_TOKEN"
}
response = requests.get(
"https://uploads.ashoka.world/reports/pdf",
params={
"visit_id": visit_id,
"report_name": report_name
},
headers=headers
)const axios = require('axios');
axios.get(
'https://uploads.ashoka.world/reports/pdf',
{
params: {
visit_id: visitId,
report_name: reportName
},
headers: {
'user-id': 'YOUR_ID',
'auth-token': 'YOUR_TOKEN'
}
}
);$response = Http::withHeaders([
'user-id' => 'YOUR_ID',
'auth-token' => 'YOUR_TOKEN'
])->get('https://uploads.ashoka.world/reports/pdf', [
'visit_id' => $visit_id,
'report_name' => $report_name
]);HttpRequest request = HttpRequest.newBuilder()
.uri(URI.create("https://uploads.ashoka.world/reports/pdf?visit_id=" + visitId + "&report_name=" + reportName))
.header("user-id", "YOUR_ID")
.header("auth-token", "YOUR_TOKEN")
.GET()
.build();url := "https://uploads.ashoka.world/reports/pdf?visit_id=" + visitId + "&report_name=" + reportName
req, _ := http.NewRequest("GET", url, nil)
req.Header.Add("user-id", "YOUR_ID")
req.Header.Add("auth-token", "YOUR_TOKEN")uri = URI("https://uploads.ashoka.world/reports/pdf?visit_id=#{visit_id}&report_name=#{report_name}")
request = Net::HTTP::Get.new(uri)
request['user-id'] = 'YOUR_ID'
request['auth-token'] = 'YOUR_TOKEN'var client = new HttpClient();
client.DefaultRequestHeaders.Add("user-id", "YOUR_ID");
client.DefaultRequestHeaders.Add("auth-token", "YOUR_TOKEN");
var response = await client.GetAsync(
$"https://uploads.ashoka.world/reports/pdf?visit_id={visitId}&report_name={reportName}"
);{
"status": true,
"status_code": "NT_2501",
"download_url": "https://nt-asset-store.s3.ap-south-1.amazonaws.com/.../{report_name}/{visit_id}.pdf?X-Amz-...",
"expires_in": 600
}{
"status": false,
"message": "Unauthorized",
"status_code": "NT_0000"
}{
"status": false,
"status_code": "NT_2503",
"message": "Report not found"
}Additional API
Manage and retrieve patient records and their associated visit histories.

List All Patients
GET /nt-capture/patient/getPatientscurl -H "user-id: YOUR_ID" -H "auth-token: YOUR_TOKEN" https://api.ashoka.world/nt-capture/patient/getPatientsimport requests
headers = {"user-id": "YOUR_ID", "auth-token": "YOUR_TOKEN"}
response = requests.get("https://api.ashoka.world/nt-capture/patient/getPatients", headers=headers)const axios = require('axios');
axios.get('https://api.ashoka.world/nt-capture/patient/getPatients', {headers: {'user-id': 'YOUR_ID', 'auth-token': 'YOUR_TOKEN'}});$response = Http::withHeaders(['user-id' => 'YOUR_ID', 'auth-token' => 'YOUR_TOKEN'])->get('https://api.ashoka.world/nt-capture/patient/getPatients');HttpRequest req = HttpRequest.newBuilder().uri(URI.create("https://api.ashoka.world/nt-capture/patient/getPatients")).header("user-id", "YOUR_ID").header("auth-token", "YOUR_TOKEN").build();req, _ := http.NewRequest("GET", "https://api.ashoka.world/nt-capture/patient/getPatients", nil)
req.Header.Add("user-id", "YOUR_ID")
req.Header.Add("auth-token", "YOUR_TOKEN")uri = URI("https://api.ashoka.world/nt-capture/patient/getPatients")
request = Net::HTTP::Get.new(uri)
request['user-id'] = 'YOUR_ID'
request['auth-token'] = 'YOUR_TOKEN'client.DefaultRequestHeaders.Add("user-id", "YOUR_ID");
client.DefaultRequestHeaders.Add("auth-token", "YOUR_TOKEN");
var response = await client.GetAsync("https://api.ashoka.world/nt-capture/patient/getPatients");
                final url = Uri.parse('https://api.ashoka.world/nt-capture/report/#{visit_id}');
                final response = await http.get(
                    url,
                    headers: {
                    'user-id': 'YOUR_USER_ID',
                    'auth-token': 'YOUR_AUTH_TOKEN',
                    },
                );
                    val client = OkHttpClient()
                    val request = Request.Builder()
                        .url("https://api.ashoka.world/nt-capture/patient/getPatients")
                        .addHeader("user-id", "YOUR_USER_ID")
                        .addHeader("auth-token", "YOUR_AUTH_TOKEN")
                        .build()

                    client.newCall(request).enqueue(object : Callback {
                        override fun onResponse(call: Call, response: Response) {
                            val result = response.body?.string()
                            // Map JSON result to your Patient model
                        }
                        override fun onFailure(call: Call, e: IOException) {
                            e.printStackTrace()
                        }
                    })
                    func getPatientsList() {
                        let url = URL(string: "https://api.ashoka.world/nt-capture/patient/getPatients")!
                        var request = URLRequest(url: url)
                        request.httpMethod = "GET"
                        request.addValue("YOUR_USER_ID", forHTTPHeaderField: "user-id")
                        request.addValue("YOUR_AUTH_TOKEN", forHTTPHeaderField: "auth-token")

                        URLSession.shared.dataTask(with: request) { data, response, error in
                            if let data = data {
                                let jsonResponse = try? JSONSerialization.jsonObject(with: data)
                                print(jsonResponse ?? "No data")
                            }
                        }.resume()
                    }
{
    "status": true,
    "status_code": "NT_2501",
    "message": "Success",
    "data": [
        { "patient_code": "P-9912", "create_date": "2025-12-16 15:39:37" },
        { "patient_code": "P-1111", "create_date": "2025-10-12 11:01:47" }
    ]
}{
"status": false,
"message": "Unauthorized",
"status_code": "NT_0000"
}Get Reports by Patient
GET /nt-capture/patient/{patient_code}/reportscurl -H "user-id: YOUR_ID" -H "auth-token: YOUR_TOKEN" https://api.ashoka.world/nt-capture/patient/{patient_code}/reportsimport requests
headers = {"user-id": "YOUR_ID", "auth-token": "YOUR_TOKEN"}
response = requests.get(f"https://api.ashoka.world/nt-capture/patient/{patient_code}/reports", headers=headers)const axios = require('axios');
const headers = {'user-id': 'YOUR_ID', 'auth-token': 'YOUR_TOKEN'};
axios.get(`https://api.ashoka.world/nt-capture/patient/${patient_code}/reports`, { headers: headers });$response = Http::withHeaders(['user-id' => 'YOUR_ID', 'auth-token' => 'YOUR_TOKEN'])
->get("https://api.ashoka.world/nt-capture/patient/{$patient_code}/reports");HttpRequest req = HttpRequest.newBuilder()
.uri(URI.create("https://api.ashoka.world/nt-capture/patient/" + patientCode + "/reports"))
.header("user-id", "YOUR_ID")
.header("auth-token", "YOUR_TOKEN")
.GET()
.build();url := fmt.Sprintf("https://api.ashoka.world/nt-capture/patient/%s/reports", patientCode)
req, _ := http.NewRequest("GET", url, nil)
req.Header.Add("user-id", "YOUR_ID")
req.Header.Add("auth-token", "YOUR_TOKEN")uri = URI("https://api.ashoka.world/nt-capture/patient/#{patient_code}/reports")
request = Net::HTTP::Get.new(uri)
request['user-id'] = 'YOUR_ID'
request['auth-token'] = 'YOUR_TOKEN'var client = new HttpClient();
client.DefaultRequestHeaders.Add("user-id", "YOUR_ID");
client.DefaultRequestHeaders.Add("auth-token", "YOUR_TOKEN");
var response = await client.GetAsync($"https://api.ashoka.world/nt-capture/patient/{patientCode}/reports");
                    Future getPatientHistory(String patientCode) async {
                        final url = Uri.parse('https://api.ashoka.world/nt-capture/patient/$patientCode/reports');

                        final response = await http.get(
                            url,
                            headers: {
                            'user-id': 'YOUR_USER_ID',
                            'auth-token': 'YOUR_AUTH_TOKEN',
                            },
                        );

                        if (response.statusCode == 200) {
                            final List history = json.decode(response.body)['data'];
                            // Map history to your Timeline UI
                        }
                    }
                    val client = OkHttpClient()
                    val request = Request.Builder()
                        .url("https://api.ashoka.world/nt-capture/patient/$patientCode/reports")
                        .addHeader("user-id", "YOUR_USER_ID")
                        .addHeader("auth-token", "YOUR_AUTH_TOKEN")
                        .build()

                    client.newCall(request).enqueue(object : Callback {
                        override fun onResponse(call: Call, response: Response) {
                            val jsonData = response.body?.string()
                            // Display list of visits (visit_id, date, status)
                        }
                        override fun onFailure(call: Call, e: IOException) {
                            e.printStackTrace()
                        }
                    })
                    func fetchPatientReports(patientCode: String) {
                        let url = URL(string: "https://api.ashoka.world/nt-capture/patient/\(patientCode)/reports")!
                        var request = URLRequest(url: url)
                        request.httpMethod = "GET"
                        request.addValue("YOUR_USER_ID", forHTTPHeaderField: "user-id")
                        request.addValue("YOUR_AUTH_TOKEN", forHTTPHeaderField: "auth-token")

                        URLSession.shared.dataTask(with: request) { data, response, error in
                            if let data = data {
                                let reports = try? JSONSerialization.jsonObject(with: data)
                                print("History for \(patientCode): \(reports ?? "Empty")")
                            }
                        }.resume()
                    }
{
        "status": true,
        "status_code": "NT_2501",
        "message": "Success",
        "data": [
            { "visit_id": "1234321234r5432s1lkdajfd", "create_date": "2025-12-17 11:57:09" },
            { "visit_id": "9876543210v1234s0akshfjd", "create_date": "2025-12-17 11:23:33" }
        ]
}{
"status": false,
"status_code": "NT_2502",
"message": "Patient not found"
}{
"status": false,
"message": "Unauthorized",
"status_code": "NT_0000"
}Web SDK Integration
Web applications launch the SDK via a secure popup window. Specify the hardware type using nadi_capture_type.
const config = {
    user_id: "{{USER_ID}}",
    auth_token: "{{AUTH_TOKEN}}",
    client_code: "{{CLIENT_CODE}}",
    visit_id: "{{VISIT_ID}}",
    height: "{{HEIGHT}}",
    weight: "{{WEIGHT}}",
    age: "{{AGE}}",
    gender: "{{GENDER}}",
    prakruti: "{{PRAKRUTI}}",
    major_symptoms: "{{SYMPTOMS}}",
    nadi_capture_type: "{{TYPE}}"
};

const query = new URLSearchParams(config).toString();
window.open("https://dashboard.naditarangini.com/nt-capture?" + query,
            "CaptureUI", "width=1200,height=900");
Where to add this code?
Developers should implement this snippet within their web-based applications on the screen where the diagnostic process is initiated. It is typically triggered by a "Start Assessment" button.
Why do we use this code?
Web applications launch the SDK via a secure popup window to ensure a dedicated environment for pulse capture. By specifying the nadi_capture_type, the SDK automatically configures itself for the relevant hardware (Bluetooth or USB), allowing for a streamlined data collection process directly within the browser.
Need a completion callback?
If your system needs a server-to-server confirmation after capture completes, configure a webhook URL and consume the success payload documented in the Webhook Notifications section.
View Webhook NotificationsParameter Reference
Comprehensive list of parameters used in the SDK authentication and data payload.
| Parameter | Required | Description | Request Value |
|---|---|---|---|
| Authentication & Identity | |||
user_id |
Yes | Practitioner's unique identification number | 12345 |
auth_token |
Yes | Secure API token for session authorization | 25be054659f8eb164a61a02567449899 |
client_code |
Yes | Unique Code mentioned to identify your patient | NT_CLIENT_001 |
visit_id |
Yes | Unique Code mentioned to identify patient current visit | 4659f8eb164a61a025 |
| Patient Bio-Data | |||
prakruti |
No | Patient's prakruti (V: Vata, P: Pitta, K: Kapha, VP: Vata Pitta, VK: Vata Kapha, PV: Pitta Vata, PK: Pitta Kapha, KP: Kapha Pitta, KV: Kapha Vata) |
VK |
age |
Yes | Patient's age in years | 25 |
gender |
Yes | Biological gender (M: Male, F: Female, D: Diverse/Non Binary, N: Prefer not to disclose) |
M |
height |
Yes | Patient's height in centimeters (cm) | 165 |
weight |
Yes | Patient's weight in kilograms (kg) | 80 |
| Capture & Clinical | |||
nadi_capture_type |
No |
Hardware protocol used for capture
(1: Bluetooth, 2: USB).
Default: USB (2) |
1 |
major_symptoms |
No | Comma-separated symptoms list (or 'NA') | NA |